Help Centre
Billing & Invoicing
End-to-end billing in PlainSail – from WIP capture and approval through to invoice generation, credit notes, and payment receipting.
Before you begin
- A charging entity and entity billing preferences must be configured before invoicing
- WIP originates from three sources: time records, disbursements, and flat fees
- Invoices cannot be raised until WIP has been approved through the approval workflow
- Multi-currency billing converts WIP at the prevailing exchange rate
- Use recurring fees for predictable charges such as management or trustee fees
- Voiding an invoice is only possible if no payments have been applied
Overview
The PlainSail billing module provides a complete workflow for capturing work-in-progress (WIP), obtaining approval, generating invoices, and receipting payments. It supports multi-currency billing, deferred income, recurring fee schedules, and a configurable two-stage approval process.
The billing lifecycle follows this sequence:
- Record WIP – time entries, disbursements, or flat fees are captured against entities
- Approve WIP – client administrators and directors review and approve charges
- Raise invoice – finance generates the invoice from approved WIP
- Receipt payment – incoming funds are matched against outstanding invoices
Initial Setup
Charging entities
A charging entity is the legal entity from which invoices are issued. Before any billing can take place, at least one charging entity must be configured.
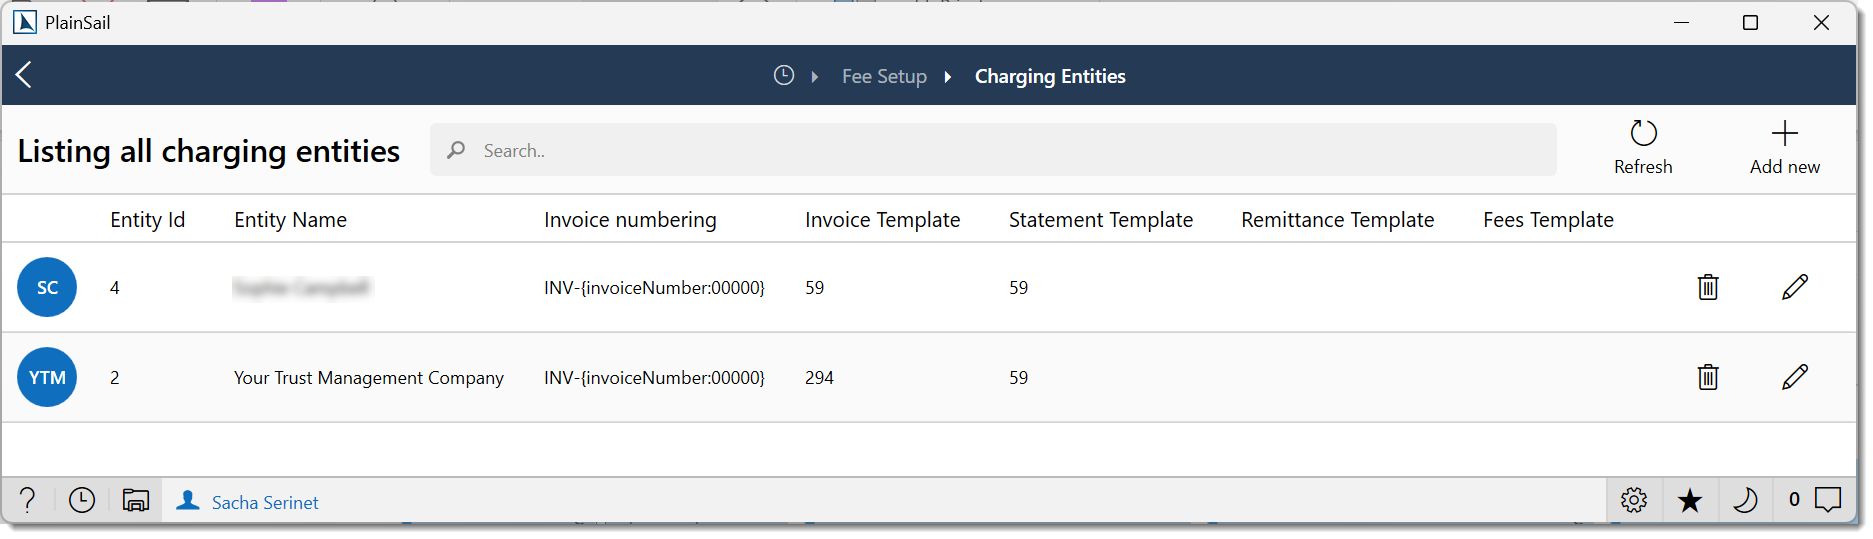
Navigate to Billing → Fee Setup → Charging Entities and provide:
- Entity – the company that will appear on invoices
- Invoice template – a Word document (.docx) defining the invoice layout
- Client statement template – a Word document for periodic statements
- Invoice number pattern – the numbering format for generated invoices
- Tax band – the default tax treatment
Entity billing preferences
Each entity that will receive invoices must be linked to a charging entity via Billing → Fee Setup → Entity Billing Preferences. This defines:
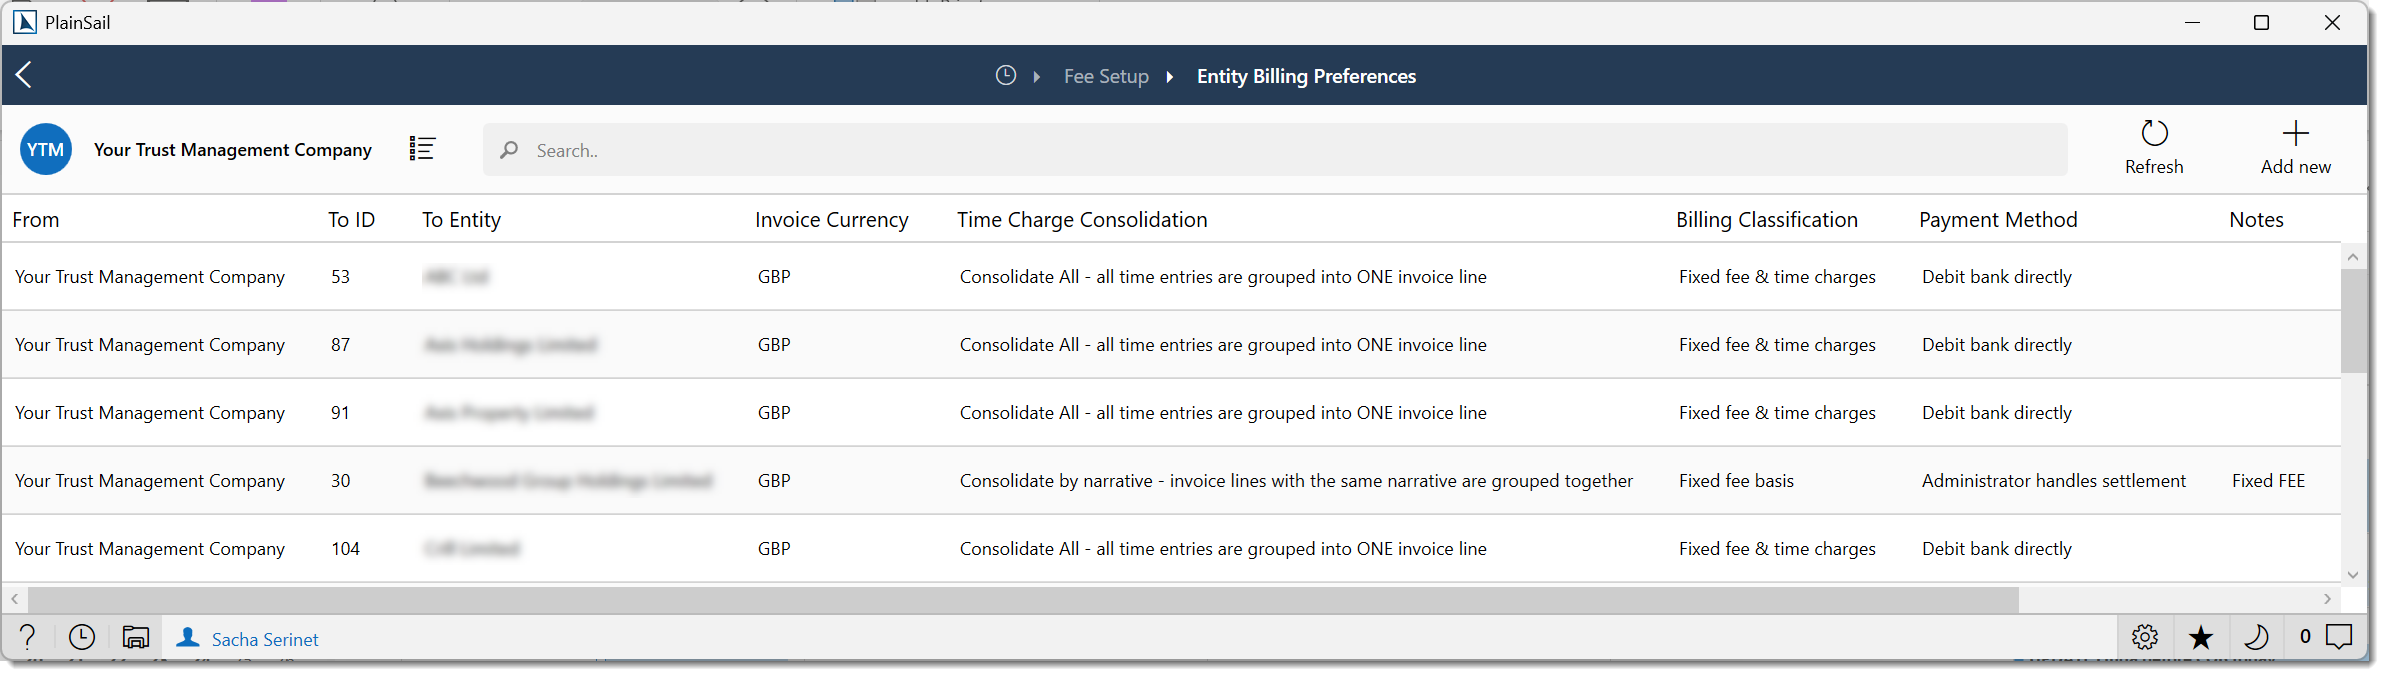
- Charging entity and To entity – who is billing whom
- Entity invoiced and Paying entity – may differ where a third party settles invoices
- Invoice currency – the currency in which invoices are denominated
- Tax band, Payment method, and Time consolidation type
- Auto bookkeep entity – controls whether accounting entries are posted automatically
Fee types
Fee types categorise charges and control how WIP is posted to the general ledger. Each fee type has a category (Flat Fee, Disbursement, Time Record, or Deposit) that determines which configuration fields are visible. Common fields include:
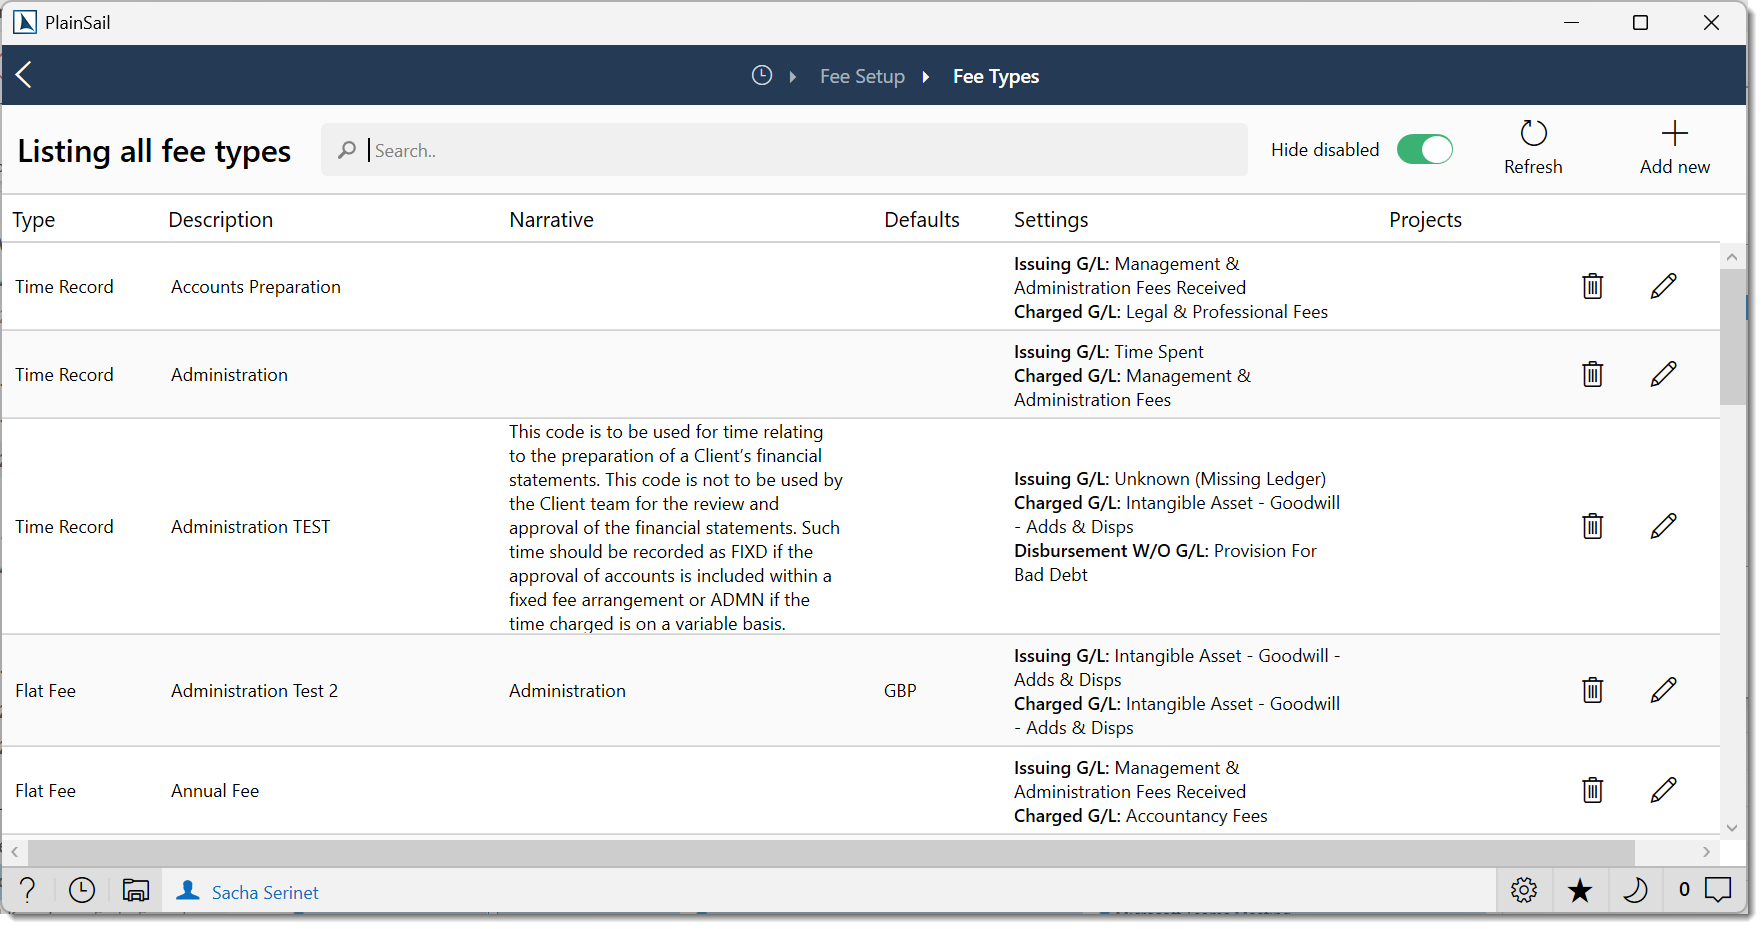
- Fee type (category) – Flat Fee, Disbursement, Time Record, or Deposit
- Default narrative and Default currency / amount / frequency (non-time-record types)
- Issuing opposite G/L account and Deferred income G/L
- Charged opposite G/L account – with optional overrides by entity type
- Write-off G/L account
The full set of fee type configuration fields is shown below. G/L fields only appear when the fee type is billable.
| Field | UI Label | Description |
|---|---|---|
| Name | Description * | The fee type name (e.g. “Administration”, “Compliance”, “Secretarial”). |
| Category | Fee type * | Flat Fee, Disbursement, Time Record, or Deposit. |
| Default Narrative | Default narrative | Default narrative text applied to WIP entries using this fee type. |
| Default Currency / Amount / Frequency | Default currency, Default amount, Default frequency | The default currency, charge amount, and billing frequency. Only shown for non-time-record types. |
| Billable | Billable | Whether time recorded under this fee type is billable. Only shown for Time Record types. |
| Avoidable (affects stats) | Avoidable (affects stats) | Whether non-billable time affects utilisation statistics. Only shown for non-billable Time Record types. |
| Associated Flat Fee | Associated flat fee | Links a time-record fee type to a corresponding flat fee. Only shown for Time Record types. |
| Issuing Opposite G/L Account | Issuing opposite G/L Account | The general ledger account used as the opposite entry when WIP is raised. |
| Deferred Income G/L | Issuing deferred income G/L Account (if applicable) | The general ledger account for deferred income recognition (fees billed in advance). |
| Charged Opposite G/L Account | Charged opposite G/L Account | The general ledger account used as the opposite entry when the fee is invoiced. Supports optional overrides by entity type. |
| Write-off G/L Account | Write-off G/L Account | The general ledger account to which write-off amounts are posted. |
Billing_FeeSetup permission to configure fee types, recurring fees, and charging entities.
Recording WIP
Work-in-progress originates from three sources:
Time records
Time entries are captured via the timesheet module. The WIP value is calculated as units × charge rate, where the charge rate is defined on the user's profile or overridden at the fee type level.
Disbursements
Disbursements represent third-party costs recharged to the client. They can be recorded in three ways:
- Via a supplier invoice with the Is Disbursement flag enabled
- Directly on the entity via Entity → Billing → Add Disbursement
- Through a recurring fee schedule
Flat fees
Fixed charges can be added via Entity → Billing → Add Fee Transaction or configured as recurring fees. All fee entries require a fee type to be specified.
WIP write-off procedure
To write off work-in-progress that will not be invoiced:
Navigate to the Billing > WIP screen.
Select the WIP items to write off and set their status to Write Off.
Proceed through the normal invoicing process. The system produces a nil-value invoice for the written-off items.
The nil invoice provides a complete audit trail showing which WIP was written off, by whom, and when.
Timesheets
The PlainSail timesheet provides a calendar-based view for recording time against entities.
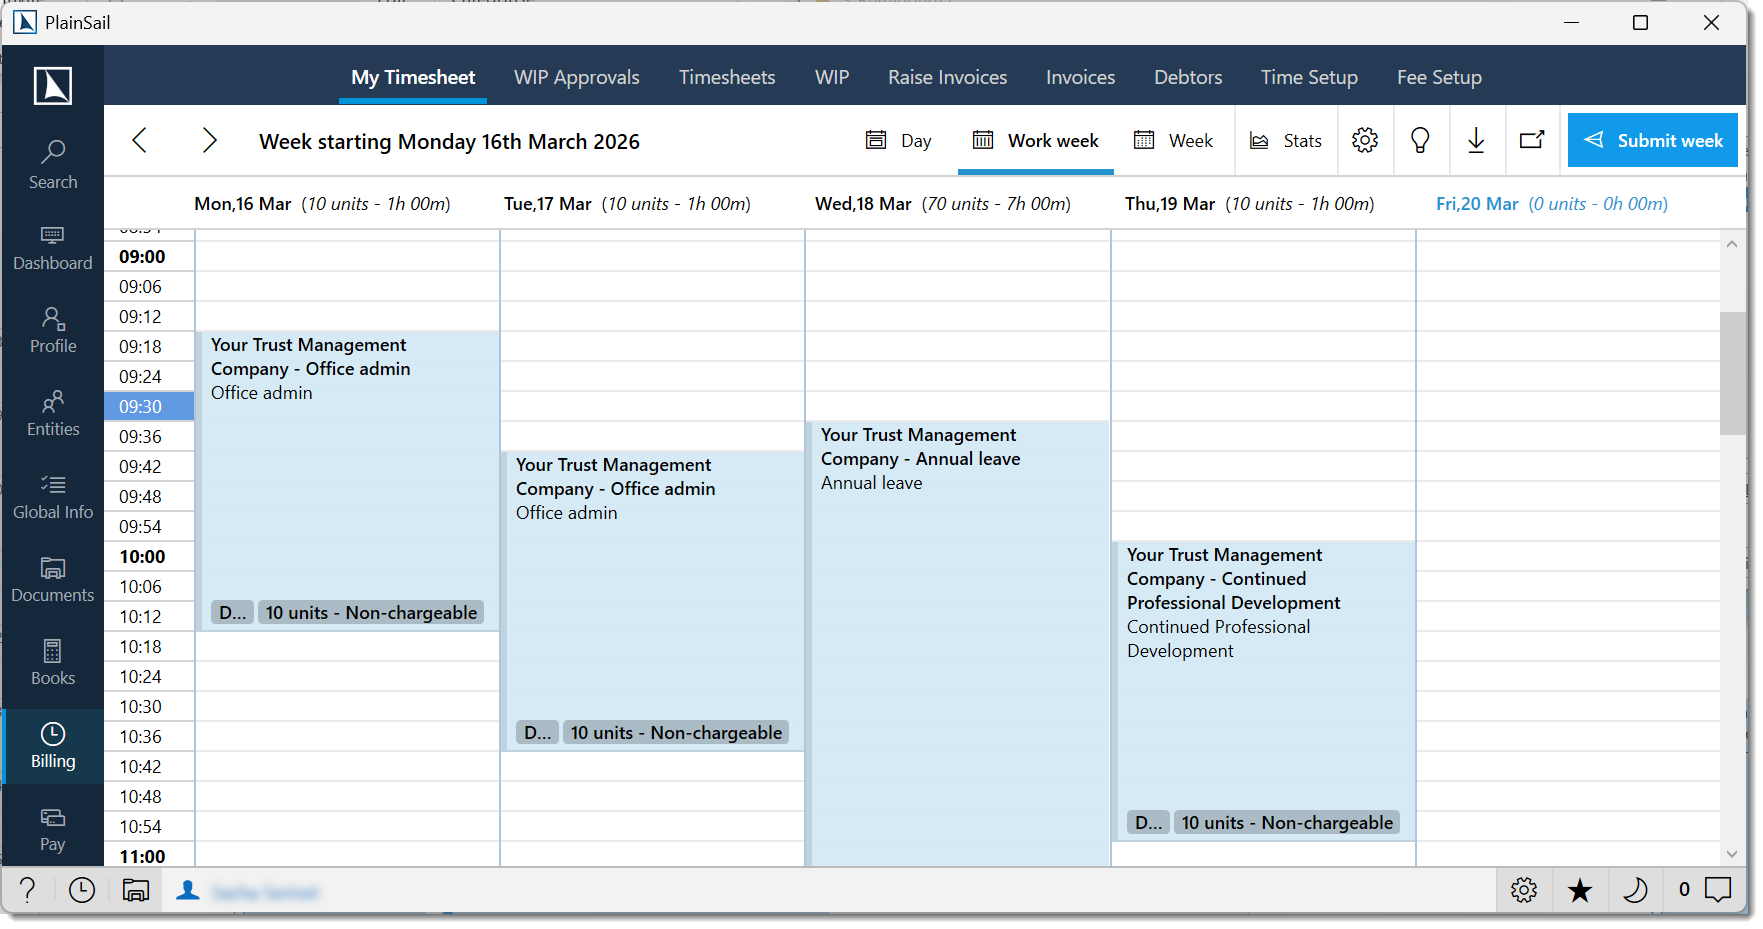
Calendar layout
The timesheet is divided into units based on your organisation's configured minutes-per-unit. Three views are available:
- Day – single day view
- Working week – Monday to Friday
- Full week – all seven days
Creating a time entry
Highlight the time units on the calendar, then right-click and select Create New Entry (or press Ctrl+N).
The time entry screen opens with start and finish times defaulted from your selection. Enter the entity, activity type, and narrative.
Click Save. To repeat the entry across subsequent days, use Repeat Entry.
Editing and copying
Double-click any draft entry to edit. To copy an entry, click it (a black border indicates selection), press Ctrl+C, click a destination cell, and press Ctrl+V.
Activity types
An activity type is a fee type used specifically for time recording. When you create a time entry on the timesheet, you select an activity type to categorise the work.
- Activity types are a subset of fee types that are marked as time-based (not disbursements).
- Your available activities may be restricted by your team – see Admin > Utilities > Update default time activities.
- The per-user activity restriction is stored in Application Settings (
LimitFeeTypesfor theAddTimeRecordscreen).
Recurring Fees
For predictable, periodic charges, configure a recurring fee schedule via Billing → Fee Setup → Recurring Fees.
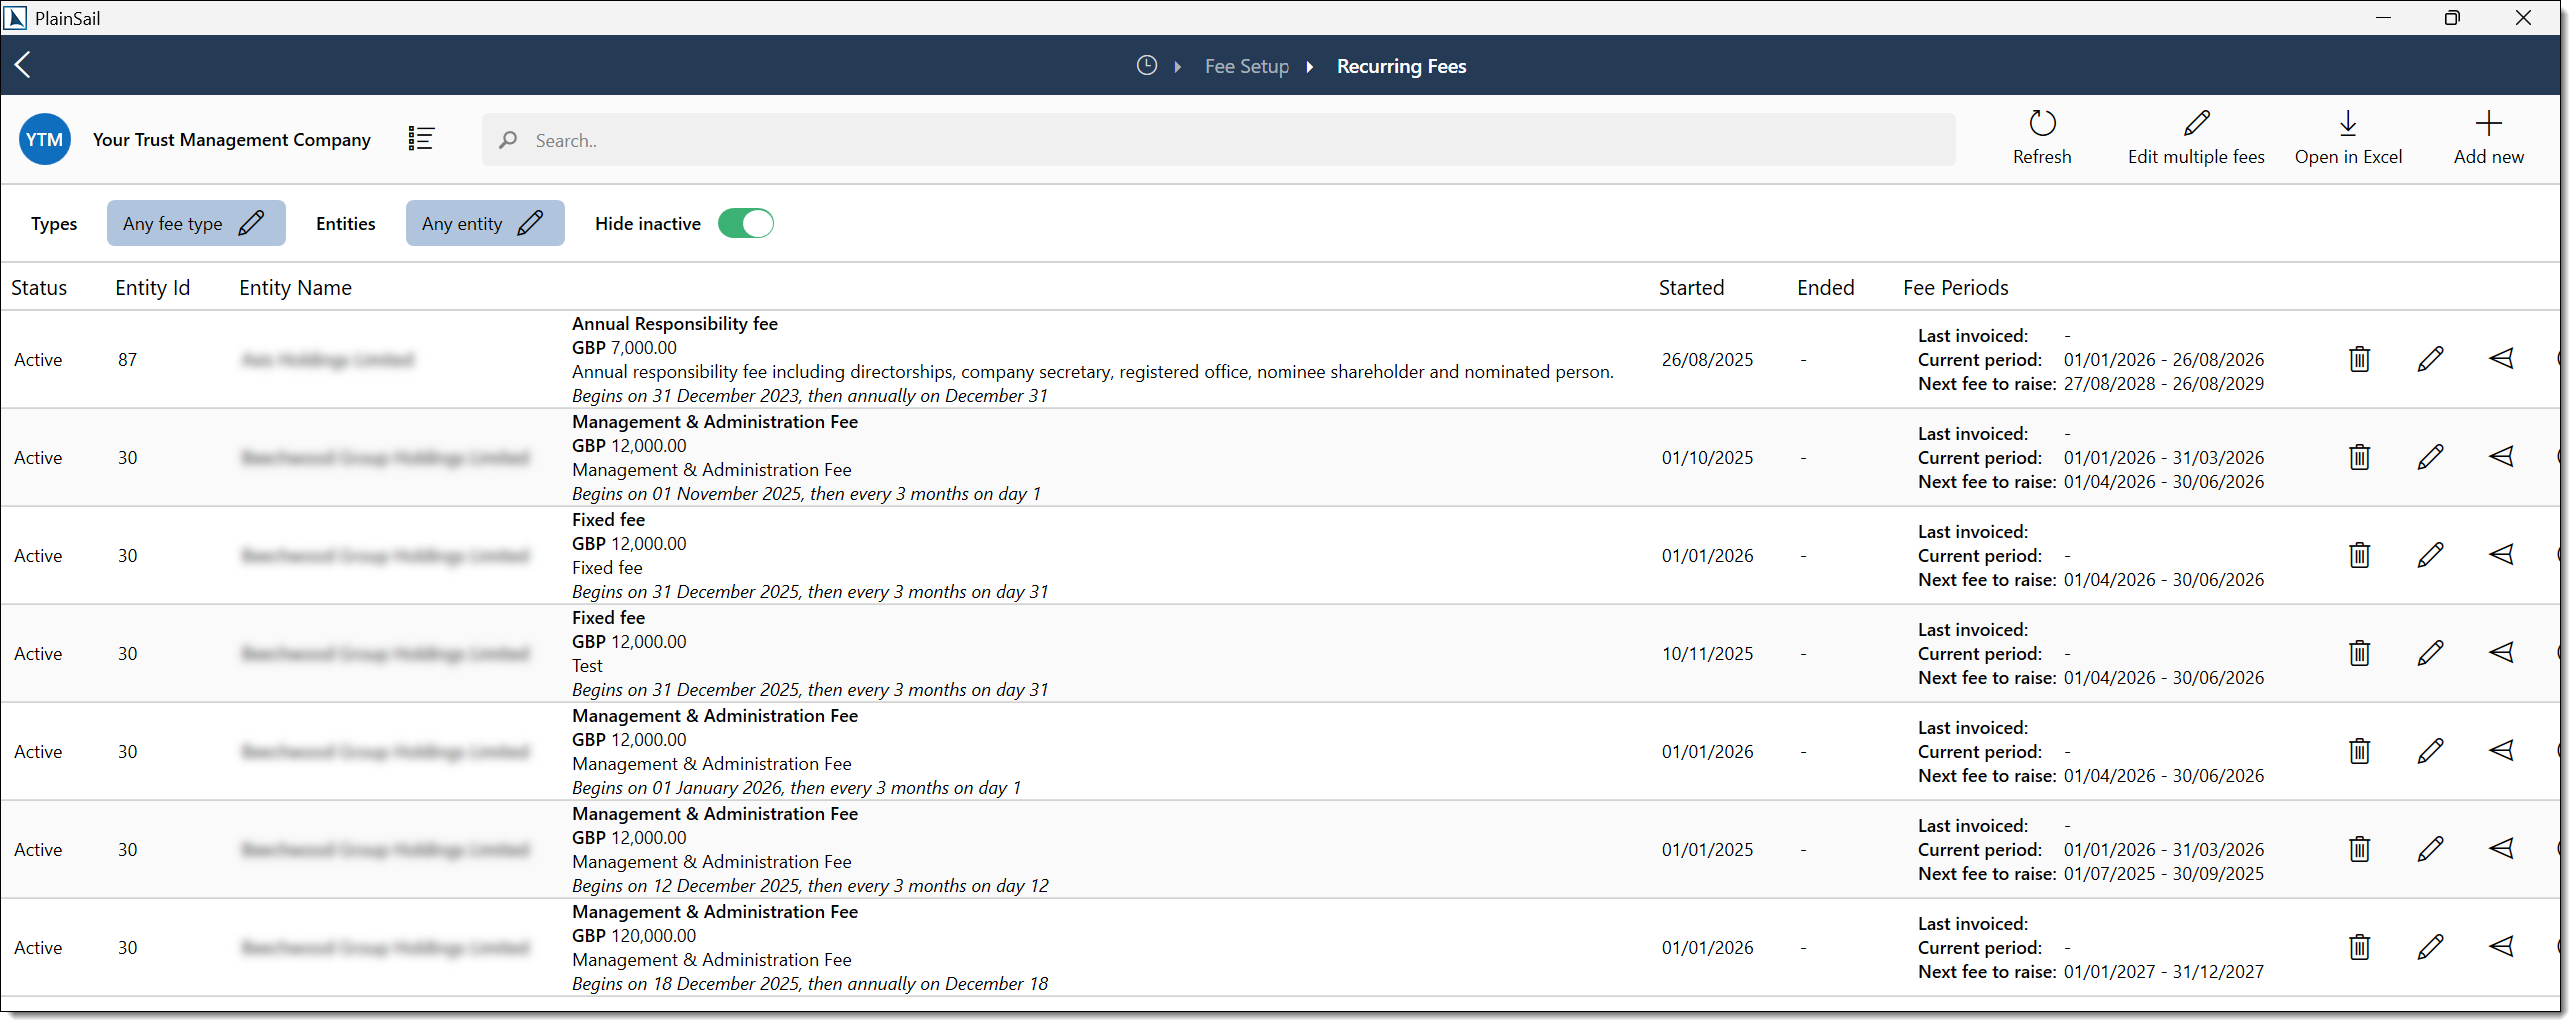
Each schedule requires:
- To entity – the entity being charged
- Type – the fee type (e.g. Management Fee, Trustee Fee)
- Annualised amount and currency
- Schedule – start date, frequency (Daily / Weekly / Monthly / Yearly), and interval
- Initial period – optional pro-rata calculation for the first period
WIP Approval Process
PlainSail supports a configurable two-stage approval workflow for WIP before invoices can be raised.
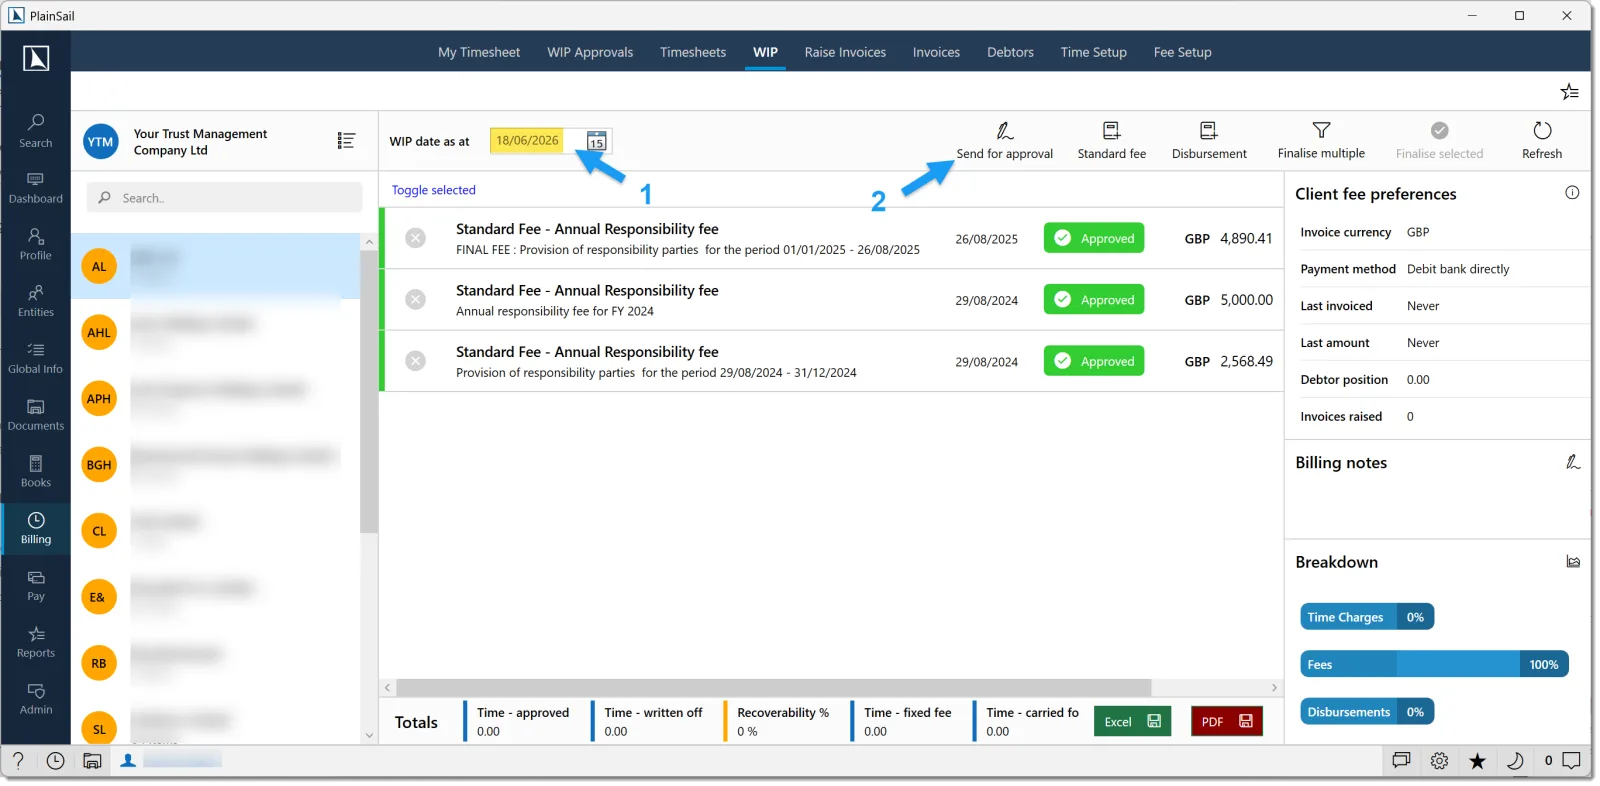
Initiating approval
Navigate to Billing → WIP. Enter the WIP date as at – the cut-off date for the billing period.
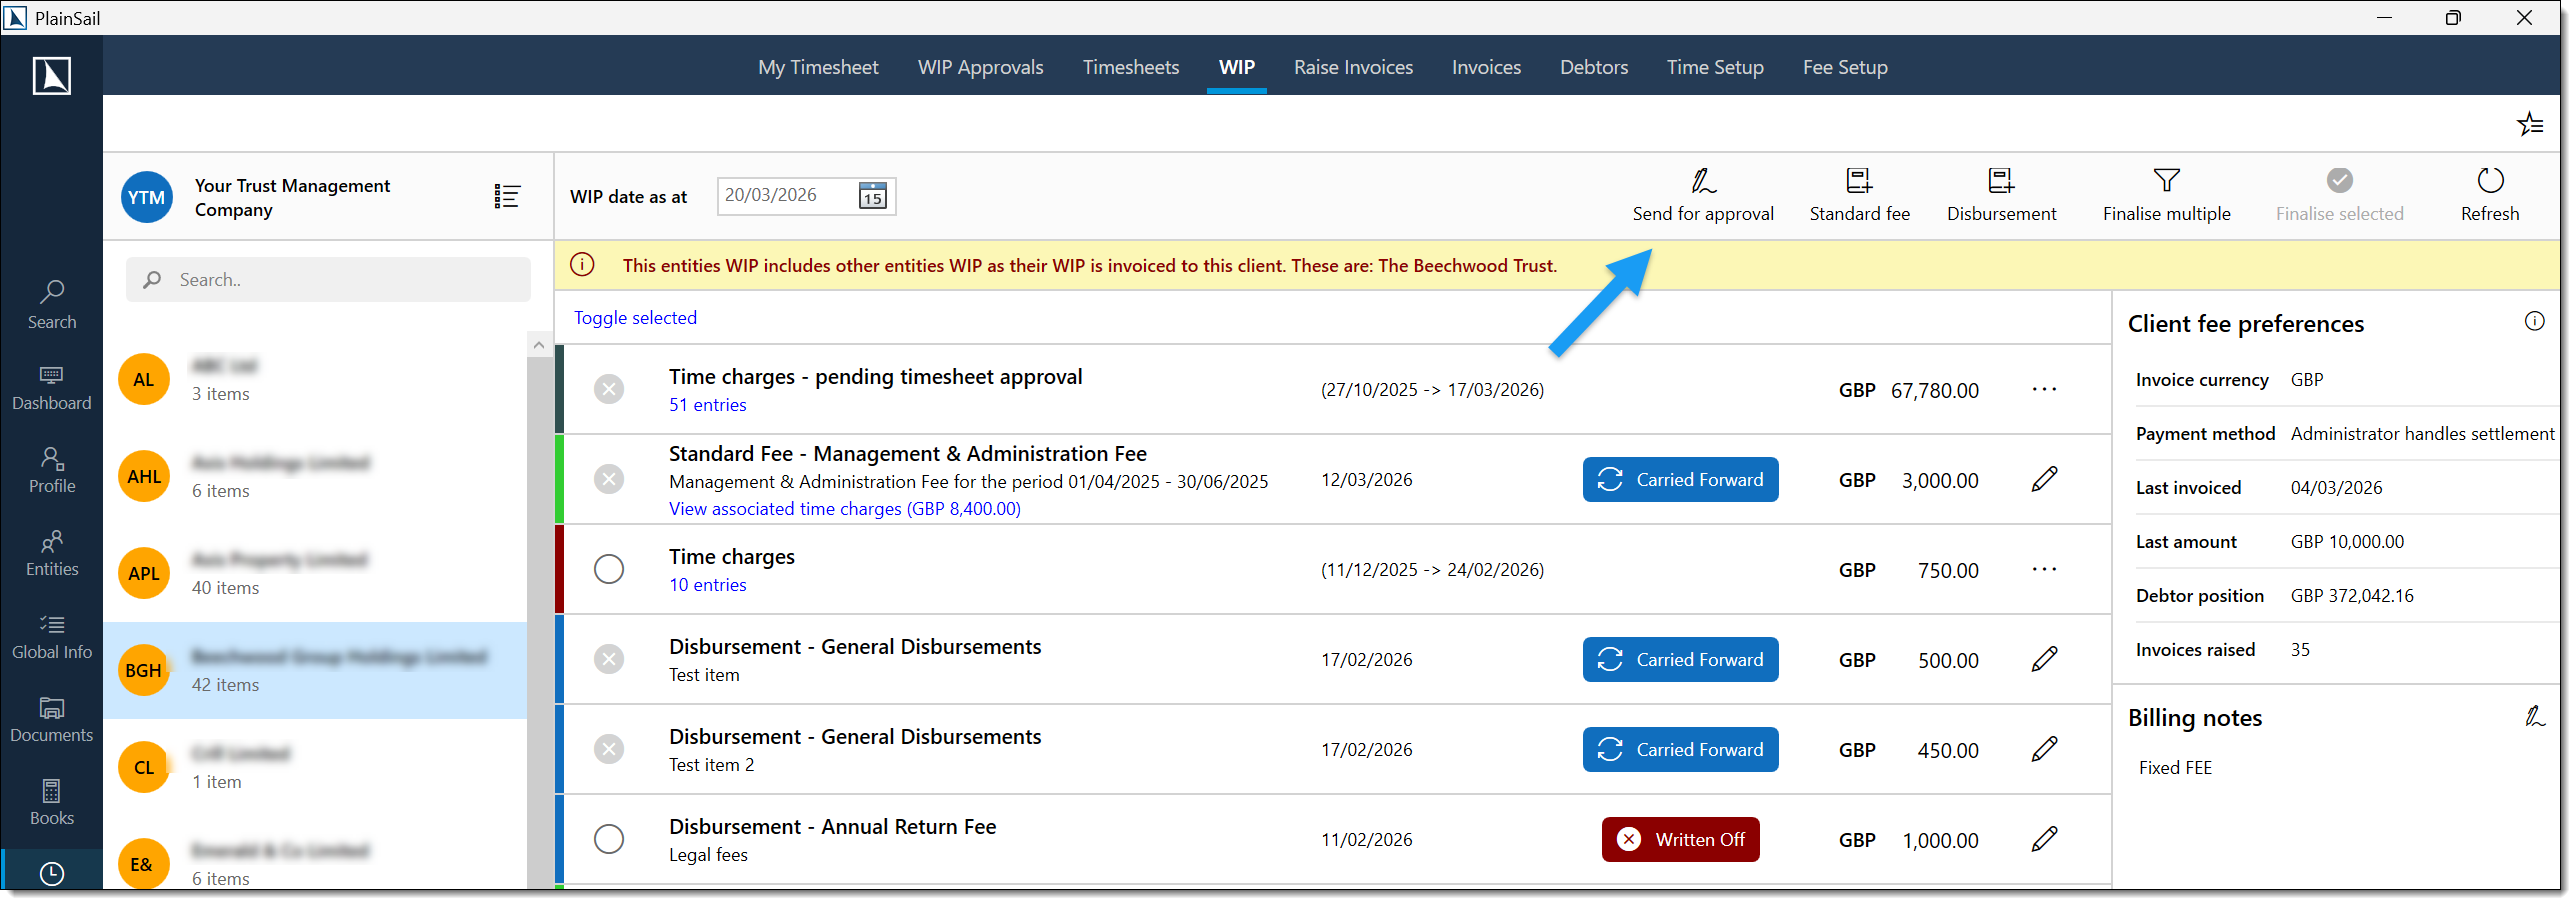
Click Send for Approval. Select the entities to include and specify the first and second approvers (typically the client administrator and director).
Click Save. Selected approvers receive a notification.
Approving WIP
Navigate to Billing → My Approvals and click View WIP.


Review each fee and set its status: Approve, Write Off, or leave as Pending.
For time charges, click the blue hyperlink to view individual entries. Use the edit icon to adjust rates or the Calculate function to modify totals.
Click Confirm. The WIP moves to the next approver or returns to finance as Ready to Invoice.
Bulk actions are available during approval:
- Approve All / Write Off All / Carry Forward All
- Set All as Fixed Fee – replace WIP total with a fixed amount
- Undo Write-Off – reverse a previously written-off item
Raising Invoices
Invoices can be raised through three methods:
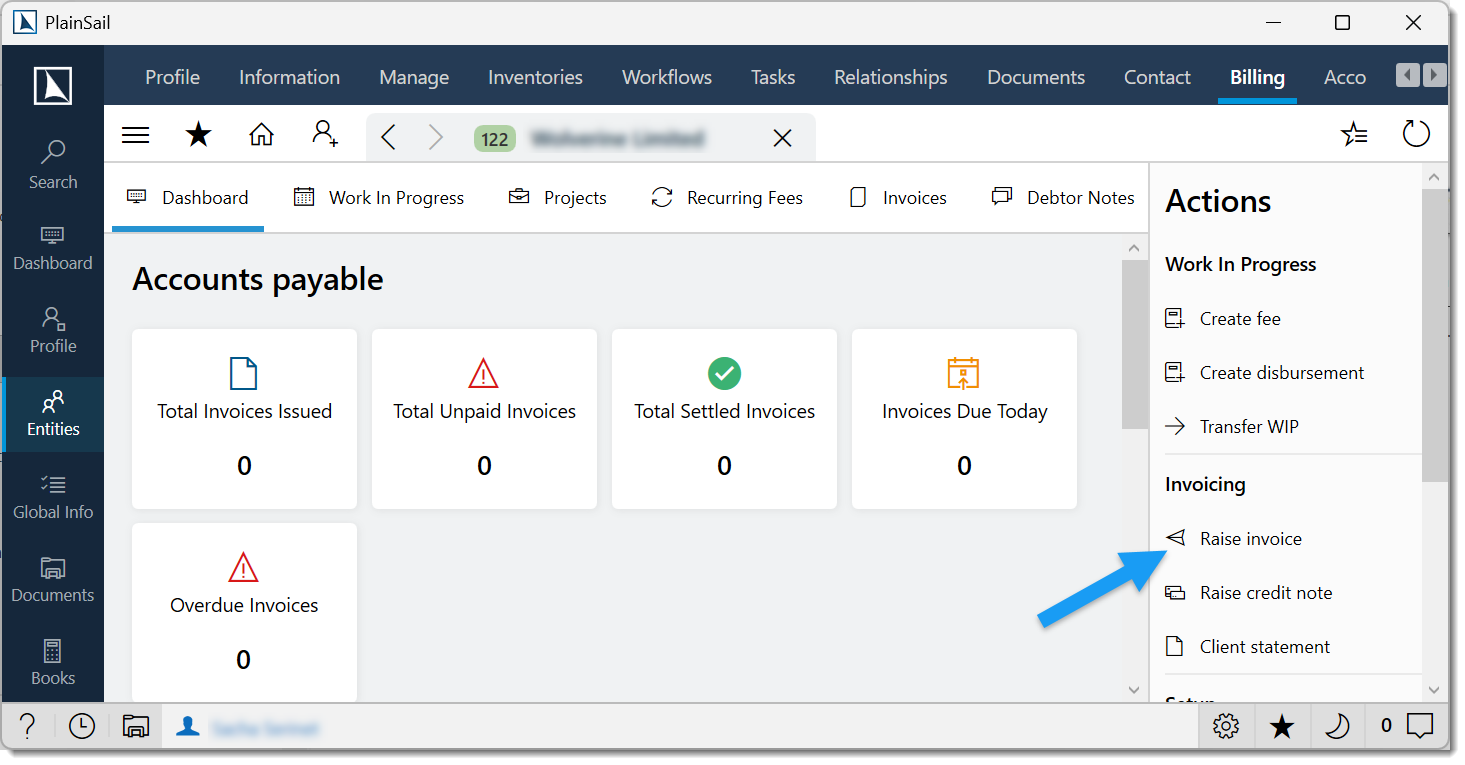
1. Ad-hoc (per entity)
Navigate to Entities → [Entity] → Billing. The billing dashboard shows WIP, recurring fees, invoices, and debtor notes. Select approved WIP and click Raise Invoice.
2. Bulk billing
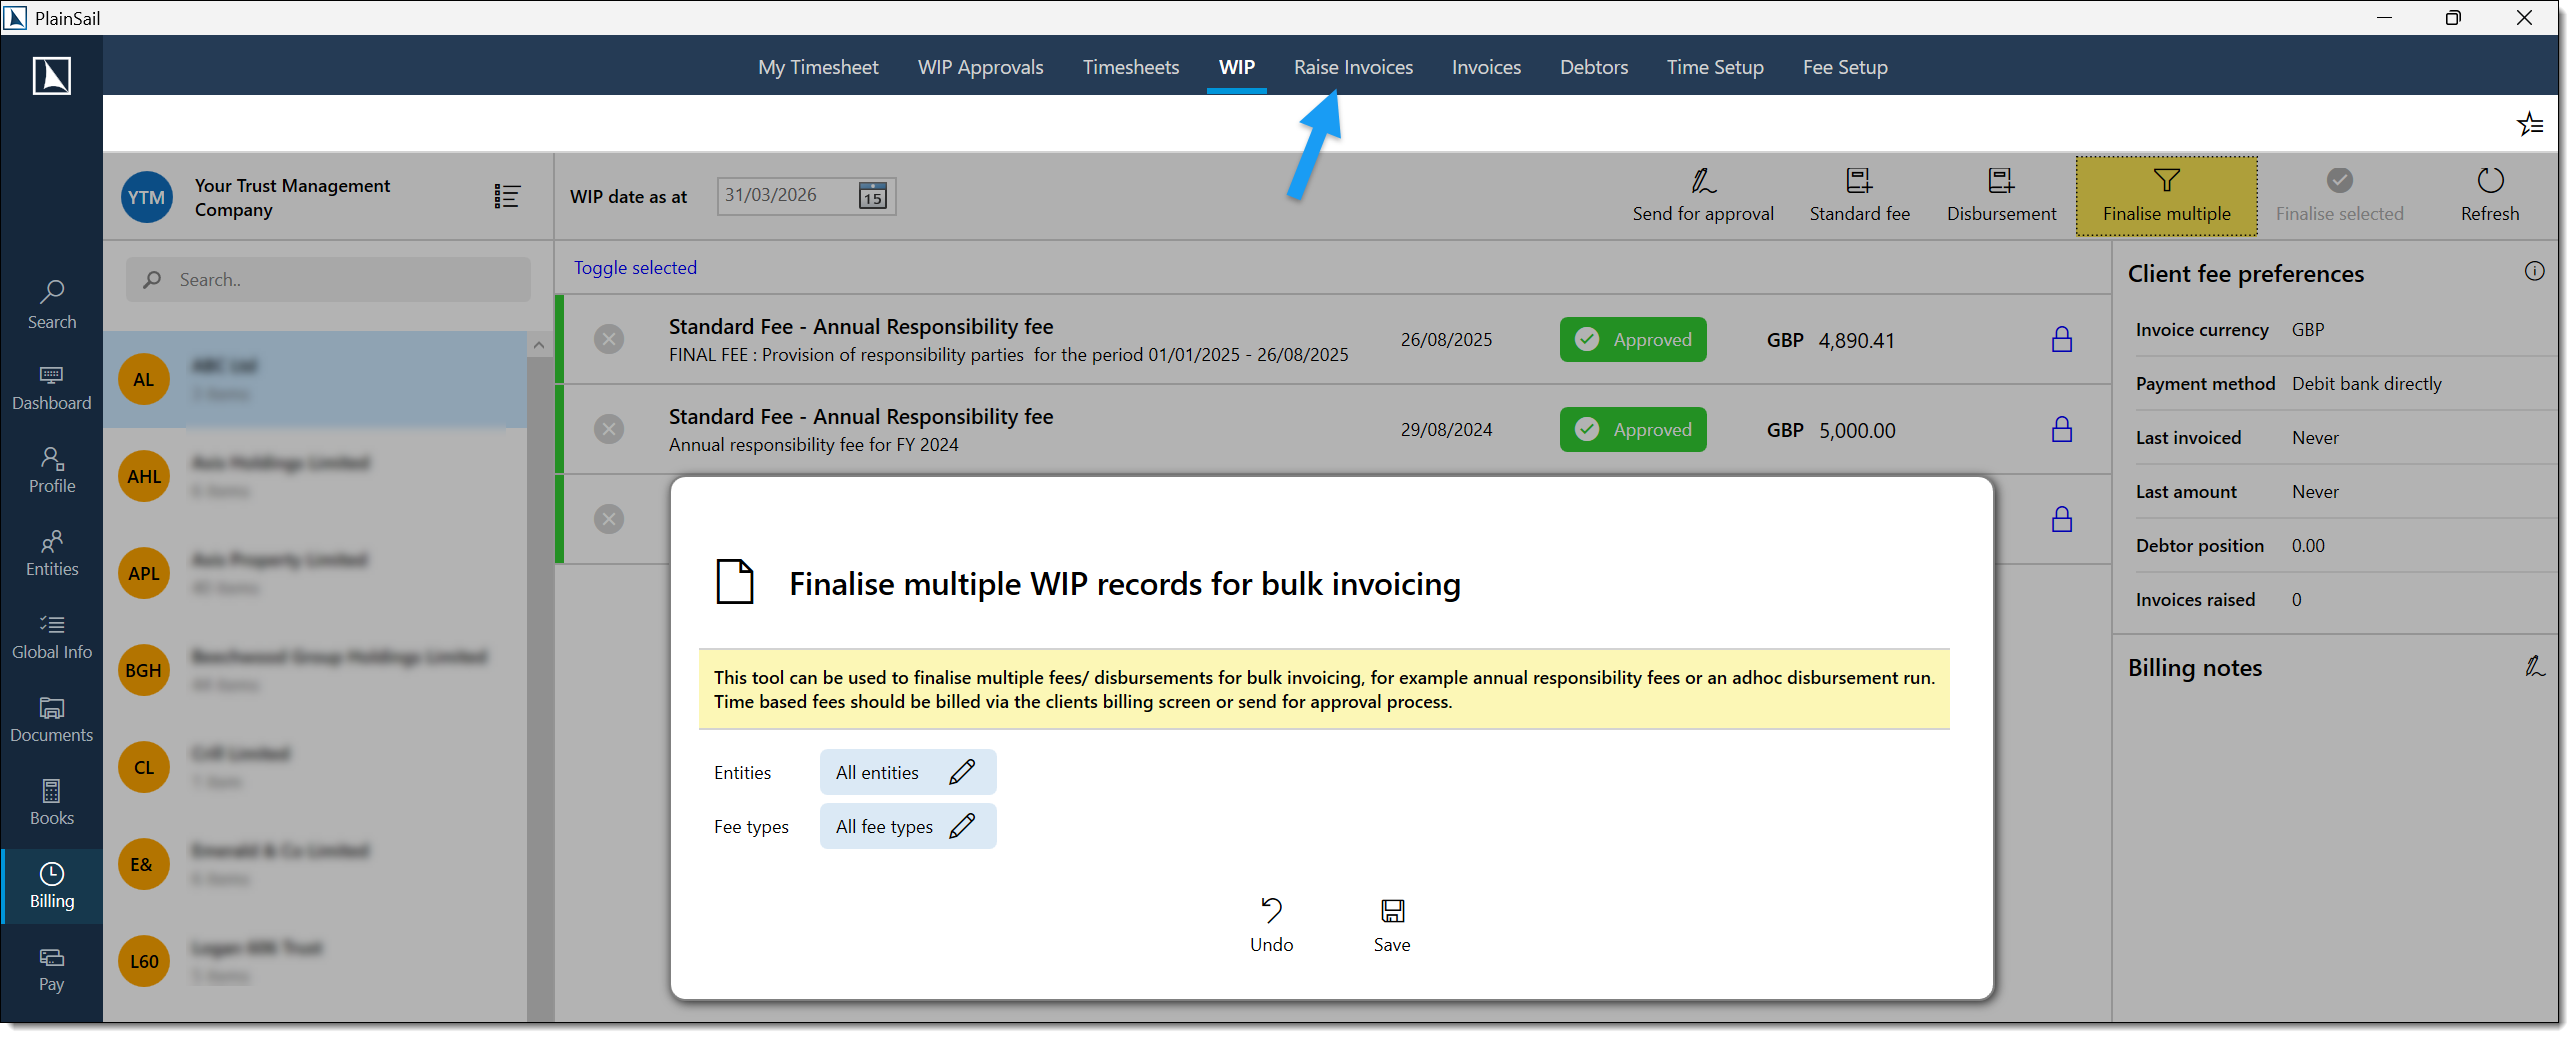
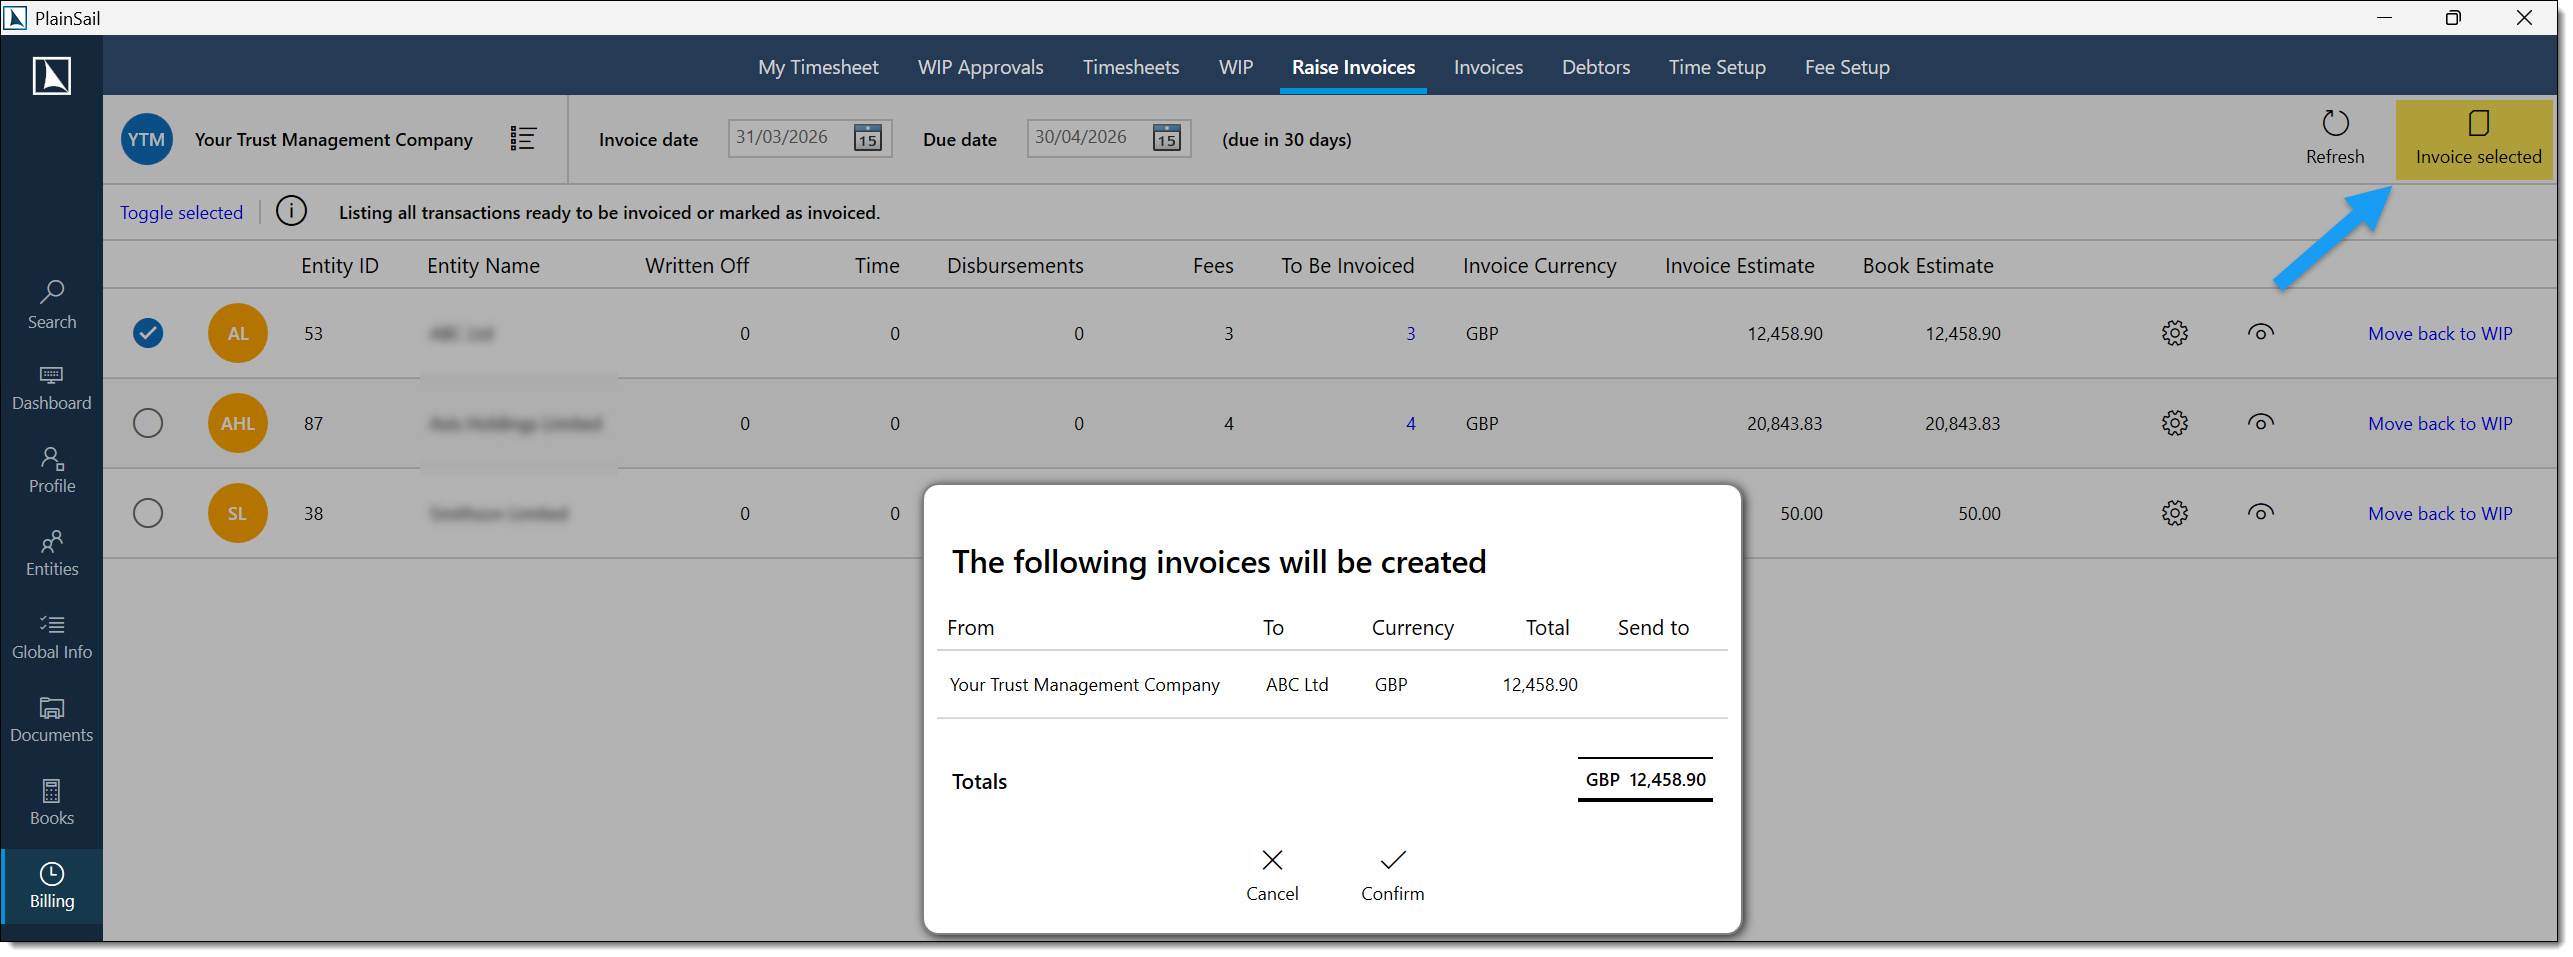
Navigate to Billing → WIP → Finalise Multiple. Filter by charging entity to lock and approve WIP in bulk, then switch to the Raise Invoices tab to generate invoices for all approved entities at once.
3. Via approval workflow
Navigate to Billing → My Approvals and filter by status. When both approvers have confirmed, the Ready to Invoice icon appears. Click Raise Invoice, review the summary, and proceed.
Invoice generation steps
Select the approved WIP items to include and click Next.
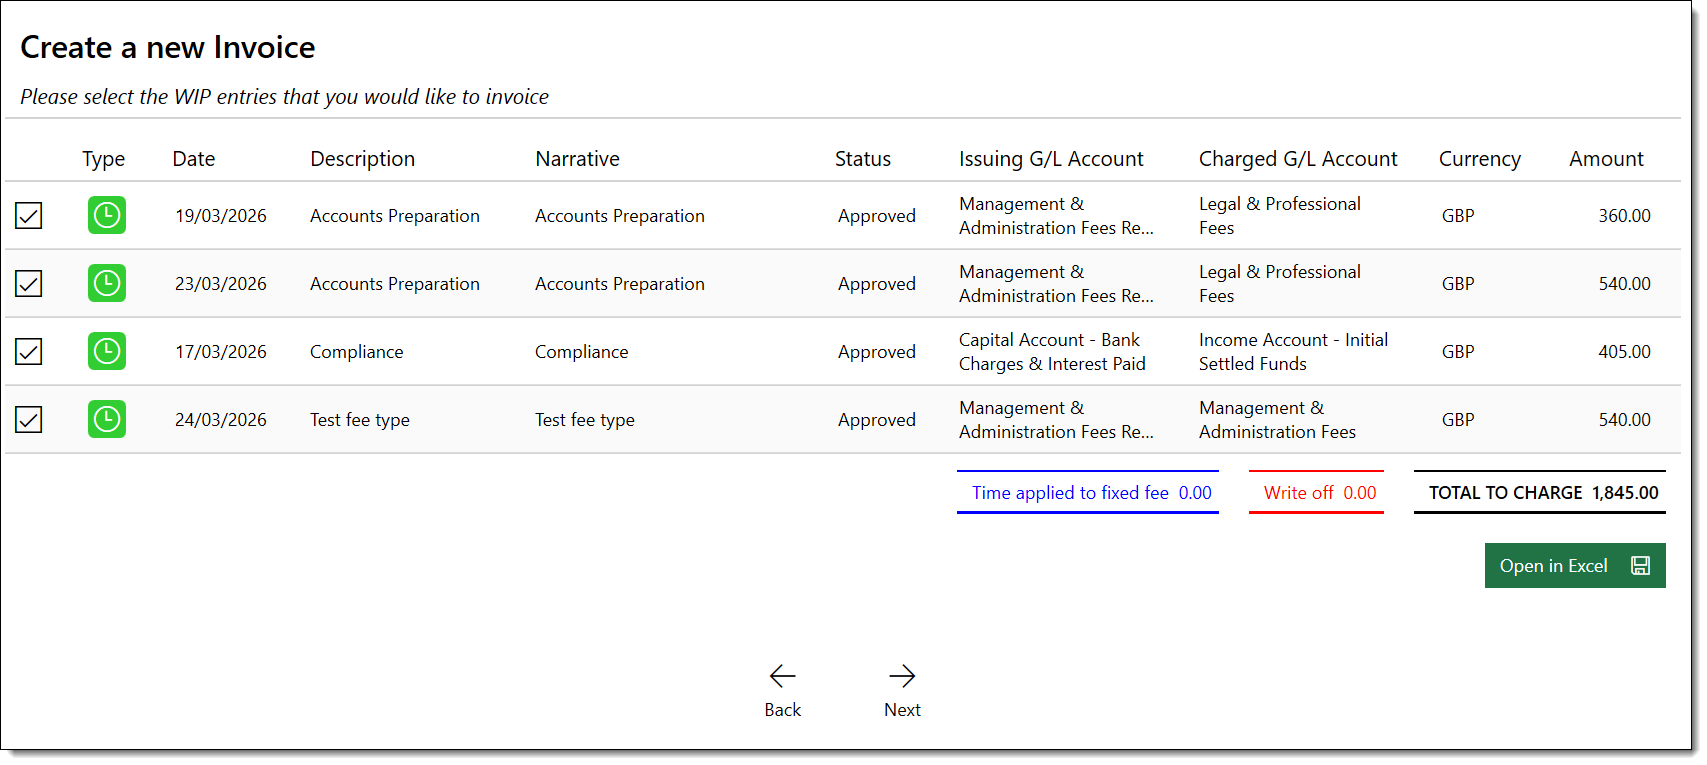
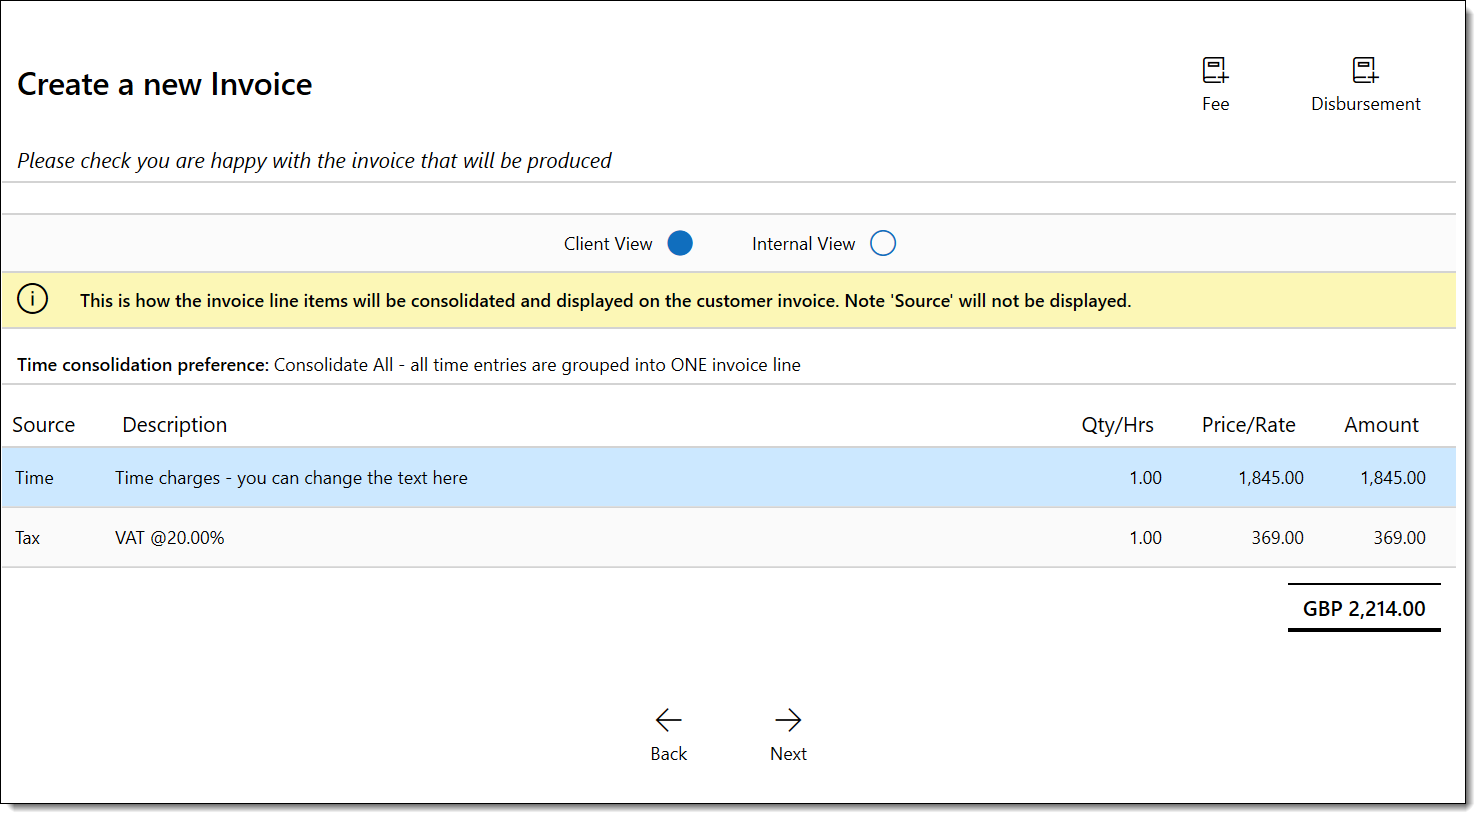
Review the invoice summary. Add any additional charges (e.g. disbursement supplements) at this stage.
Review and edit line item narratives if required.
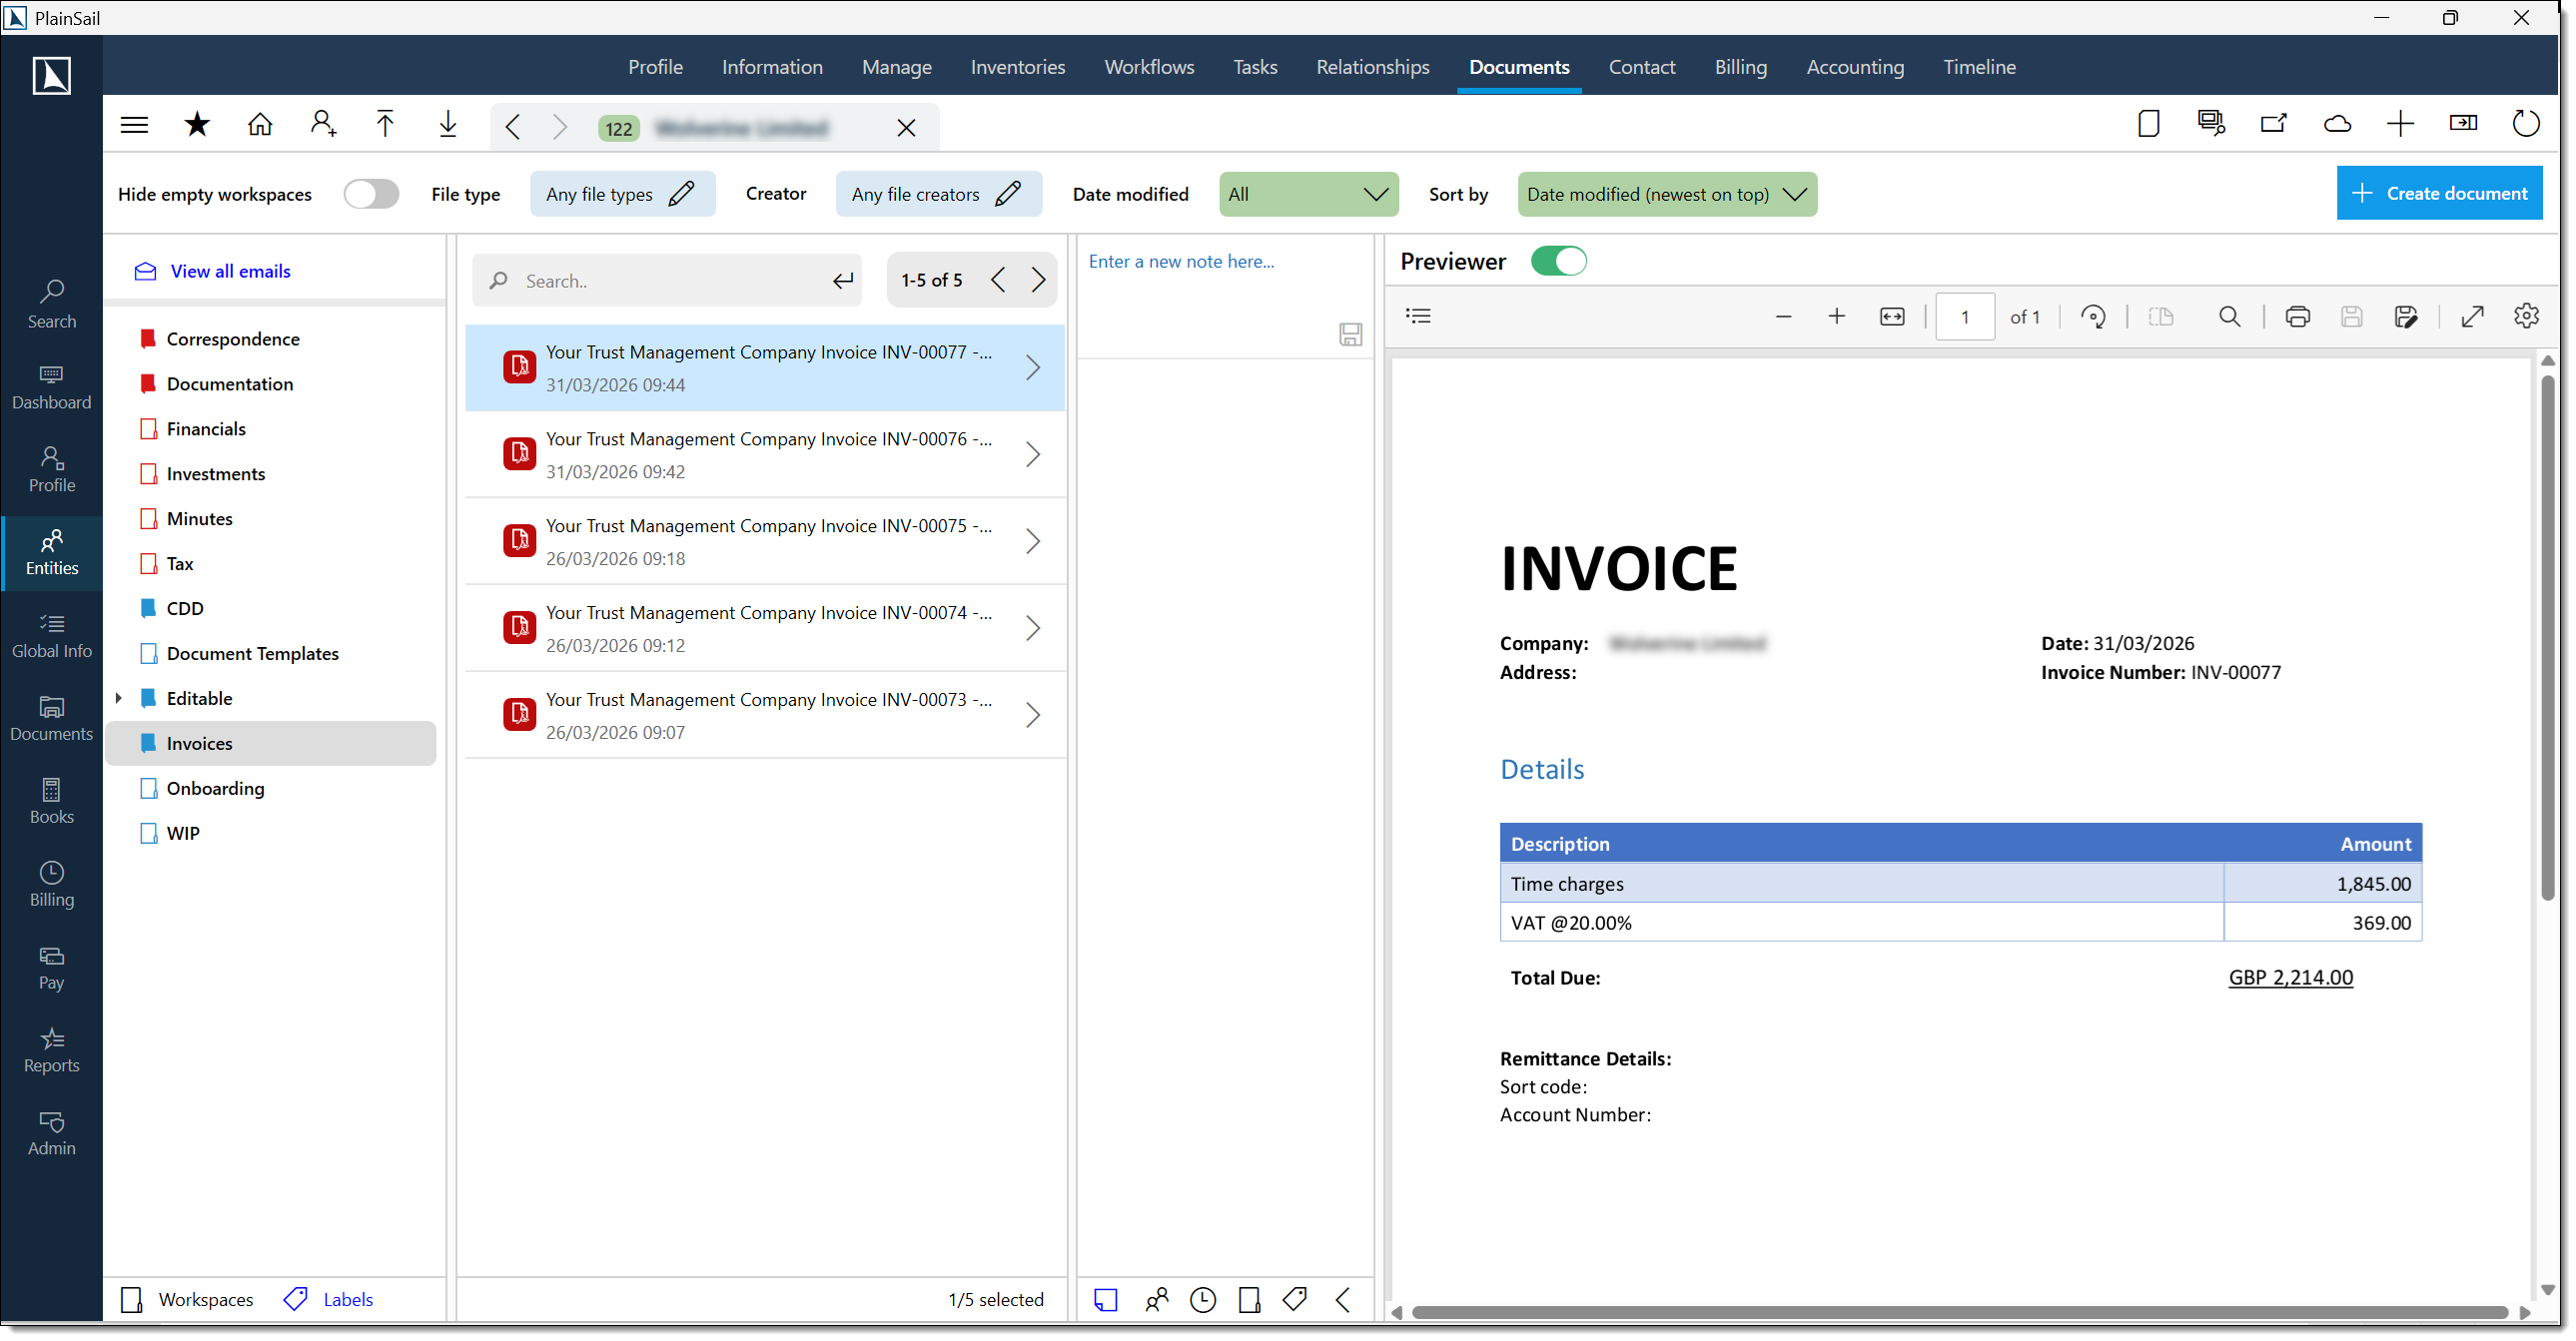
Click Approve. If automatic email delivery is configured, the invoice is dispatched immediately. Otherwise, the PDF is saved to the entity's Documents → Invoices workspace.
Auto-email delivery of invoices
If configured, invoices can be automatically emailed to clients when raised:
- The system uses the
_ClientInvoiceEmail.txttemplate for the email body. - The generated invoice PDF is attached.
- The email is sent to the client’s primary contact email address.
- This requires SMTP to be configured in the system Configuration screen.
Credit Notes & Voiding Invoices
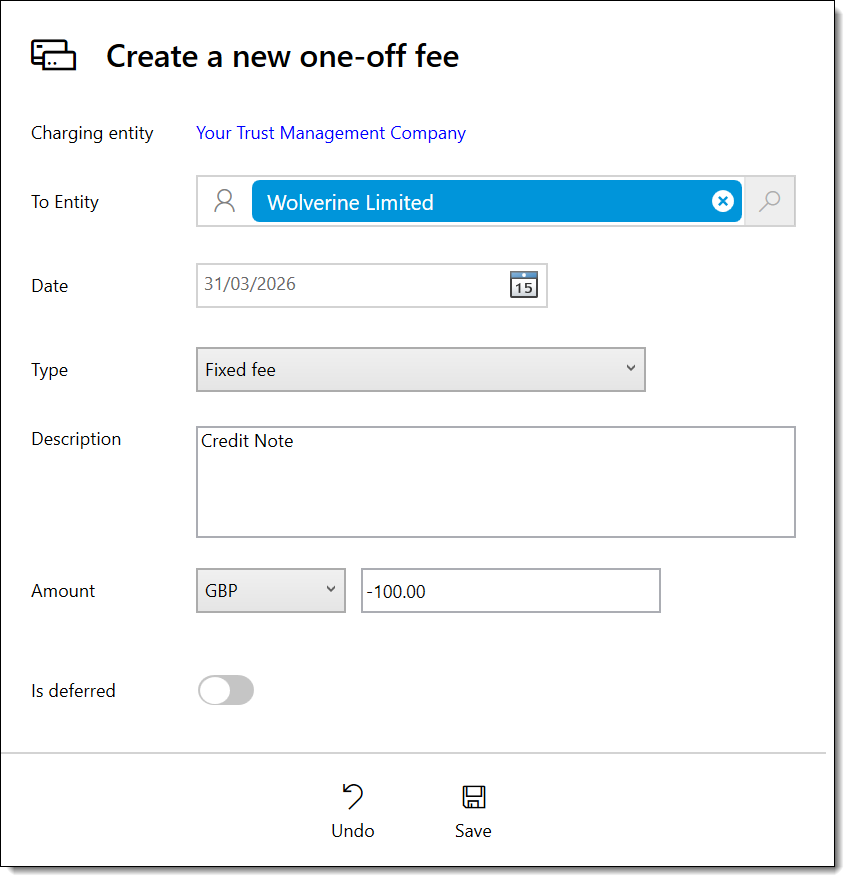
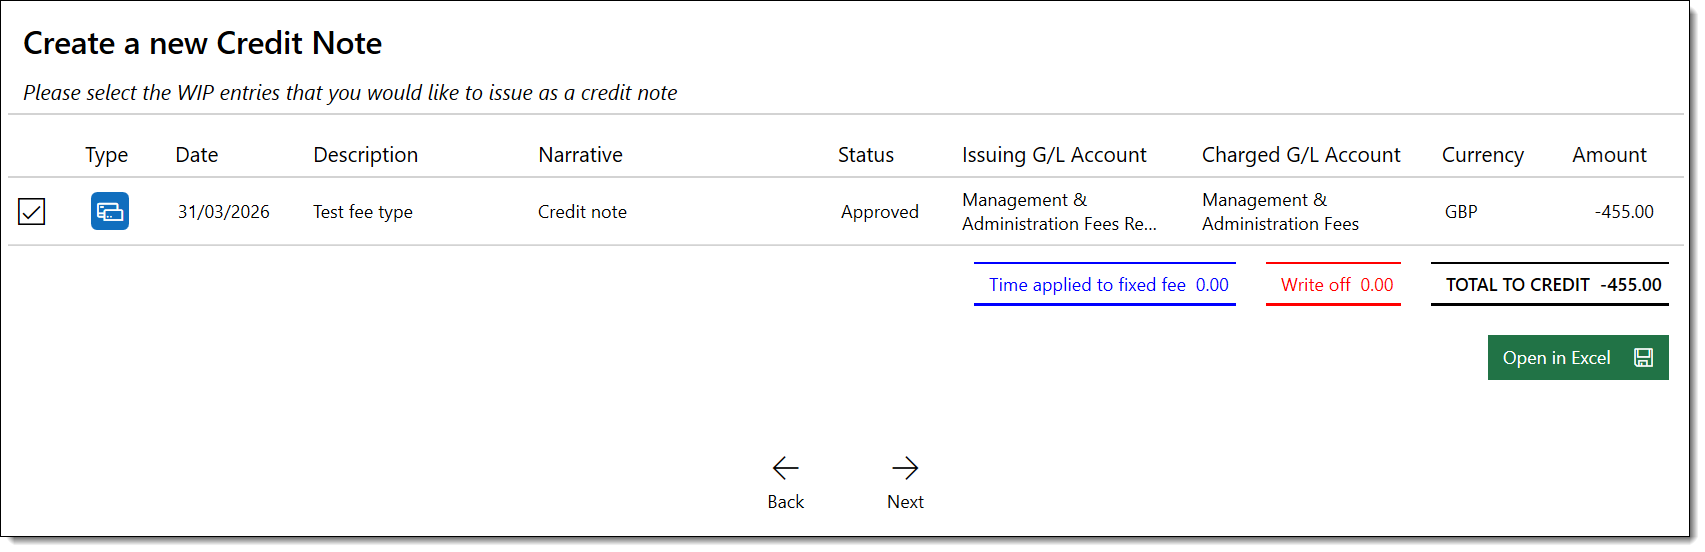
Raising a credit note
- Navigate to the entity's billing tab and click Create Fee.
- Enter the fee as a negative amount and mark it as approved.
- Click the Raise Credit Note button to generate the credit.
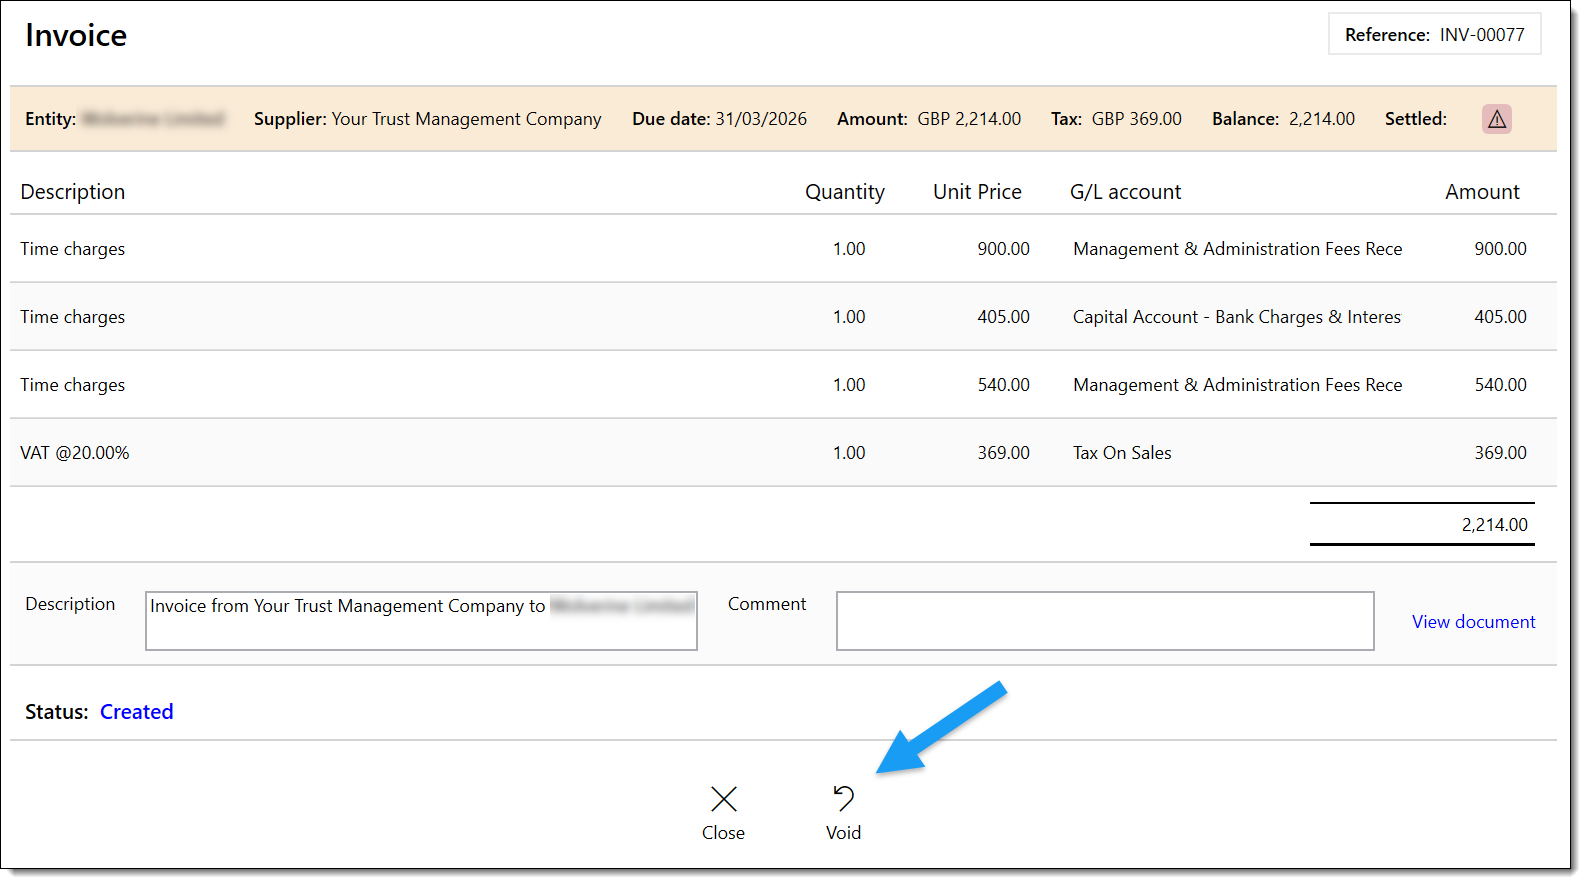
Voiding an invoice
- Navigate to Entity → Billing → Invoices.
- Click the three-line menu icon alongside the invoice.
- Select Void Invoice and confirm.
Receipting Payments
When funds are received against an invoice, post a manual journal to record the receipt:

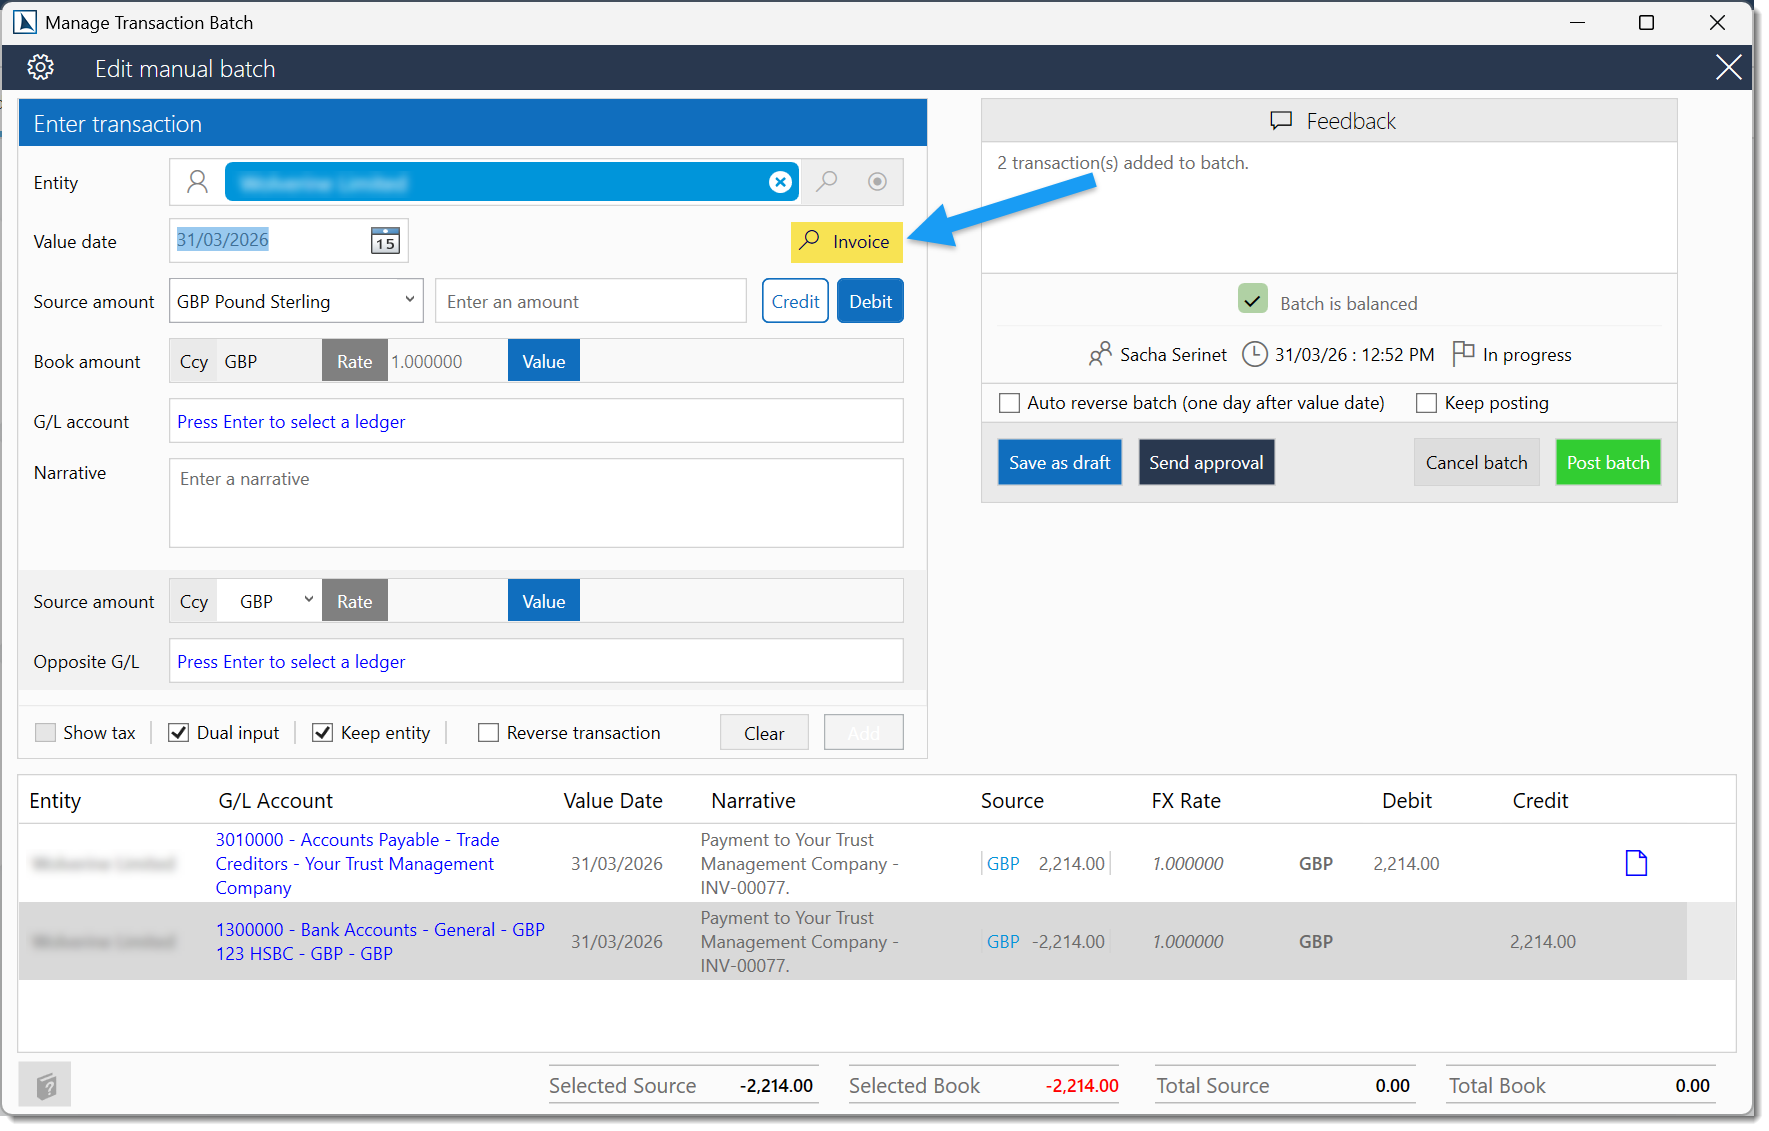
Navigate to Entities → [Entity] → Accounting → Manual Journal.
Click the Invoice icon, select the outstanding invoice, then press Tab and Enter to populate the debtor line.
Click Add, then enter the opposite G/L account (bank account). Press F3 to invert the amount.
Verify the journal balances to zero and click Post Batch.
Matching to a specific invoice
When posting the receipt, use the debtor sub-ledger entry reference to match the payment to the correct invoice. This ensures the aged debtors report correctly shows the invoice as paid.
Partial payments
If the client pays less than the full invoice amount:
- Post a receipt for the amount received.
- The remaining balance stays on the debtors report.
- When the rest is received, post another receipt for the outstanding amount.
Aged debtors report
The aged debtors report shows outstanding invoice balances grouped by age:
| Age Band | Description |
|---|---|
| Current | Invoices not yet past due. |
| 30 days | 1–30 days overdue. |
| 60 days | 31–60 days overdue. |
| 90 days | 61–90 days overdue. |
| 90+ days | More than 90 days overdue. |
You can access the aged debtors report from:
- The Billing > Debtors ribbon tab.
- The Billing widget on the Dashboard (click the “Debtors” tile).
- The Reports Dashboard under Billing reports.
Billing_ViewDebtors permission to access the aged debtors report.
Purchase Ledger
The purchase ledger records incoming supplier invoices and manages payables.
Posting a supplier invoice
Navigate to the entity's accounting tab and click Post Invoice / Credit Note.
Select the Supplier (must exist as an entity in the Supplier group), enter the currency, reference, and attach the source document.
Add line items: description, quantity, unit price, and G/L account for each line.
Click Post (or Send for Approval if four-eyes is configured). PlainSail generates the bookkeeping entries on the purchase ledger.
Automatic supplier payments
PlainSail can generate payment instructions and remittance advices for outstanding payables. Navigate to Pay → Payables, review the outstanding items, and process payments. The paying entity can be changed if a different company settles the liability.
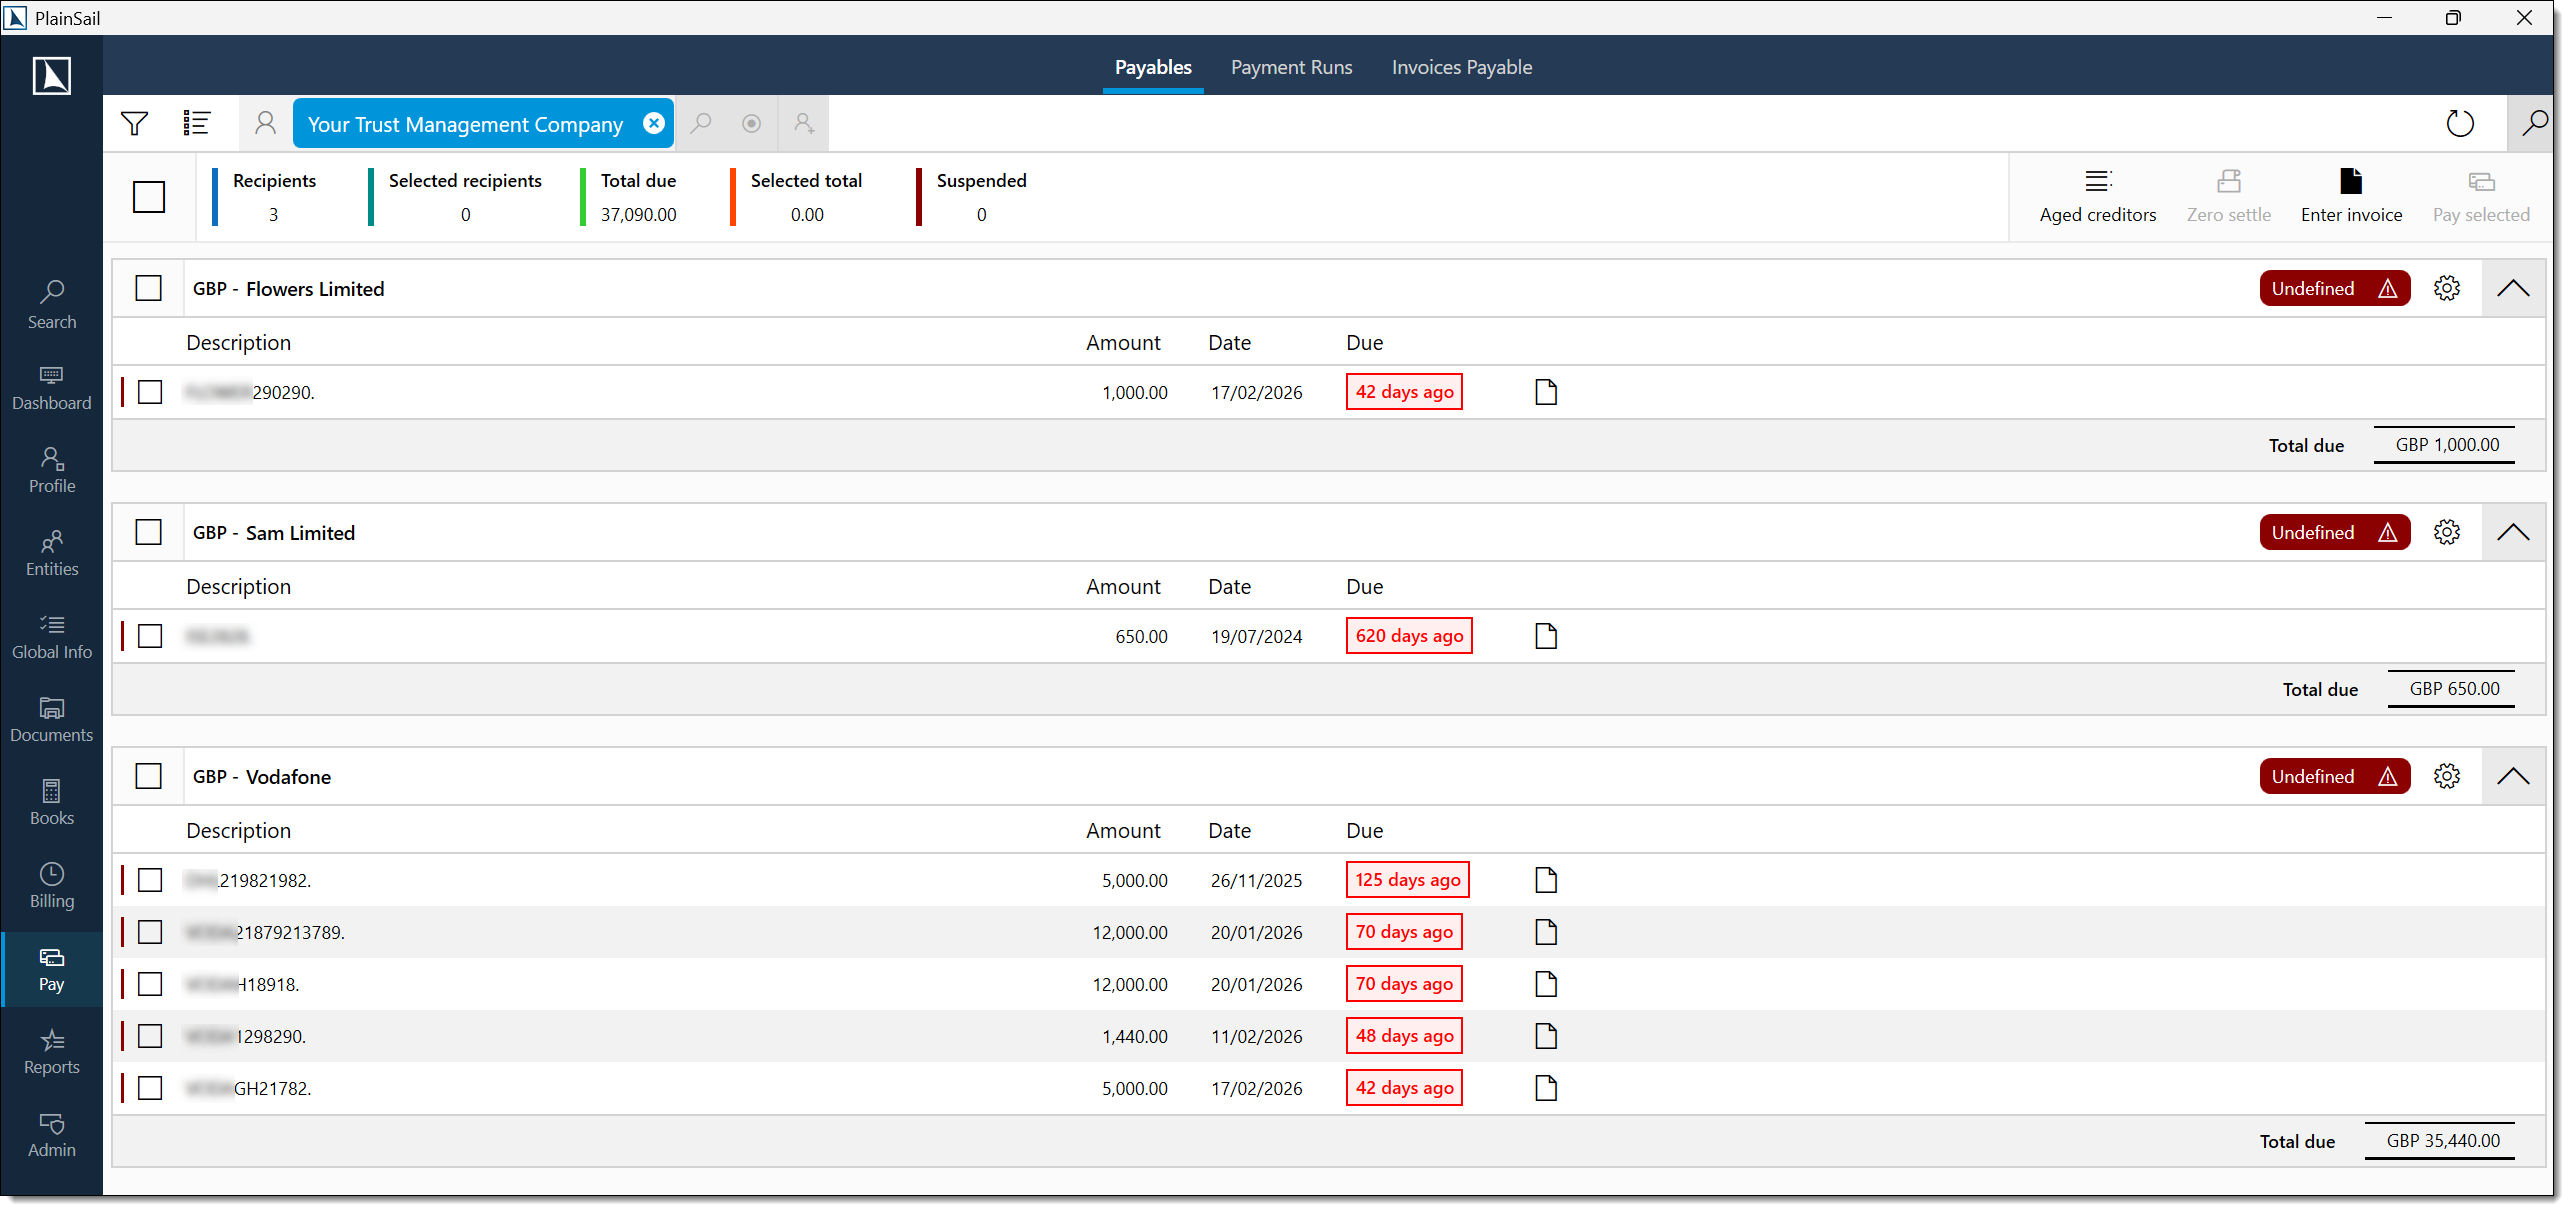
Payment runs
Payments can be grouped into a payment run (batch) for efficient processing:
- A purchase invoice is entered against an entity (via the Pay > Invoices Payable screen or from within an entity’s accounting tab).
- When the invoice is due for payment, it appears in Pay > Payables.
- Select the invoices to include and create a payment run.
- The payment run generates a bank file (e.g. HSBC CMM, HSBC SEPA) using the configured bank transfer provider plugin.
- Export the file and upload it to your bank for processing.
- Once the bank confirms the payments, update the status in PlainSail.
Invoice Templates
Invoice layouts are defined as Word document templates stored on the charging entity. Templates use {{ marker }} syntax to insert dynamic data such as client name, reference, line items, and totals.
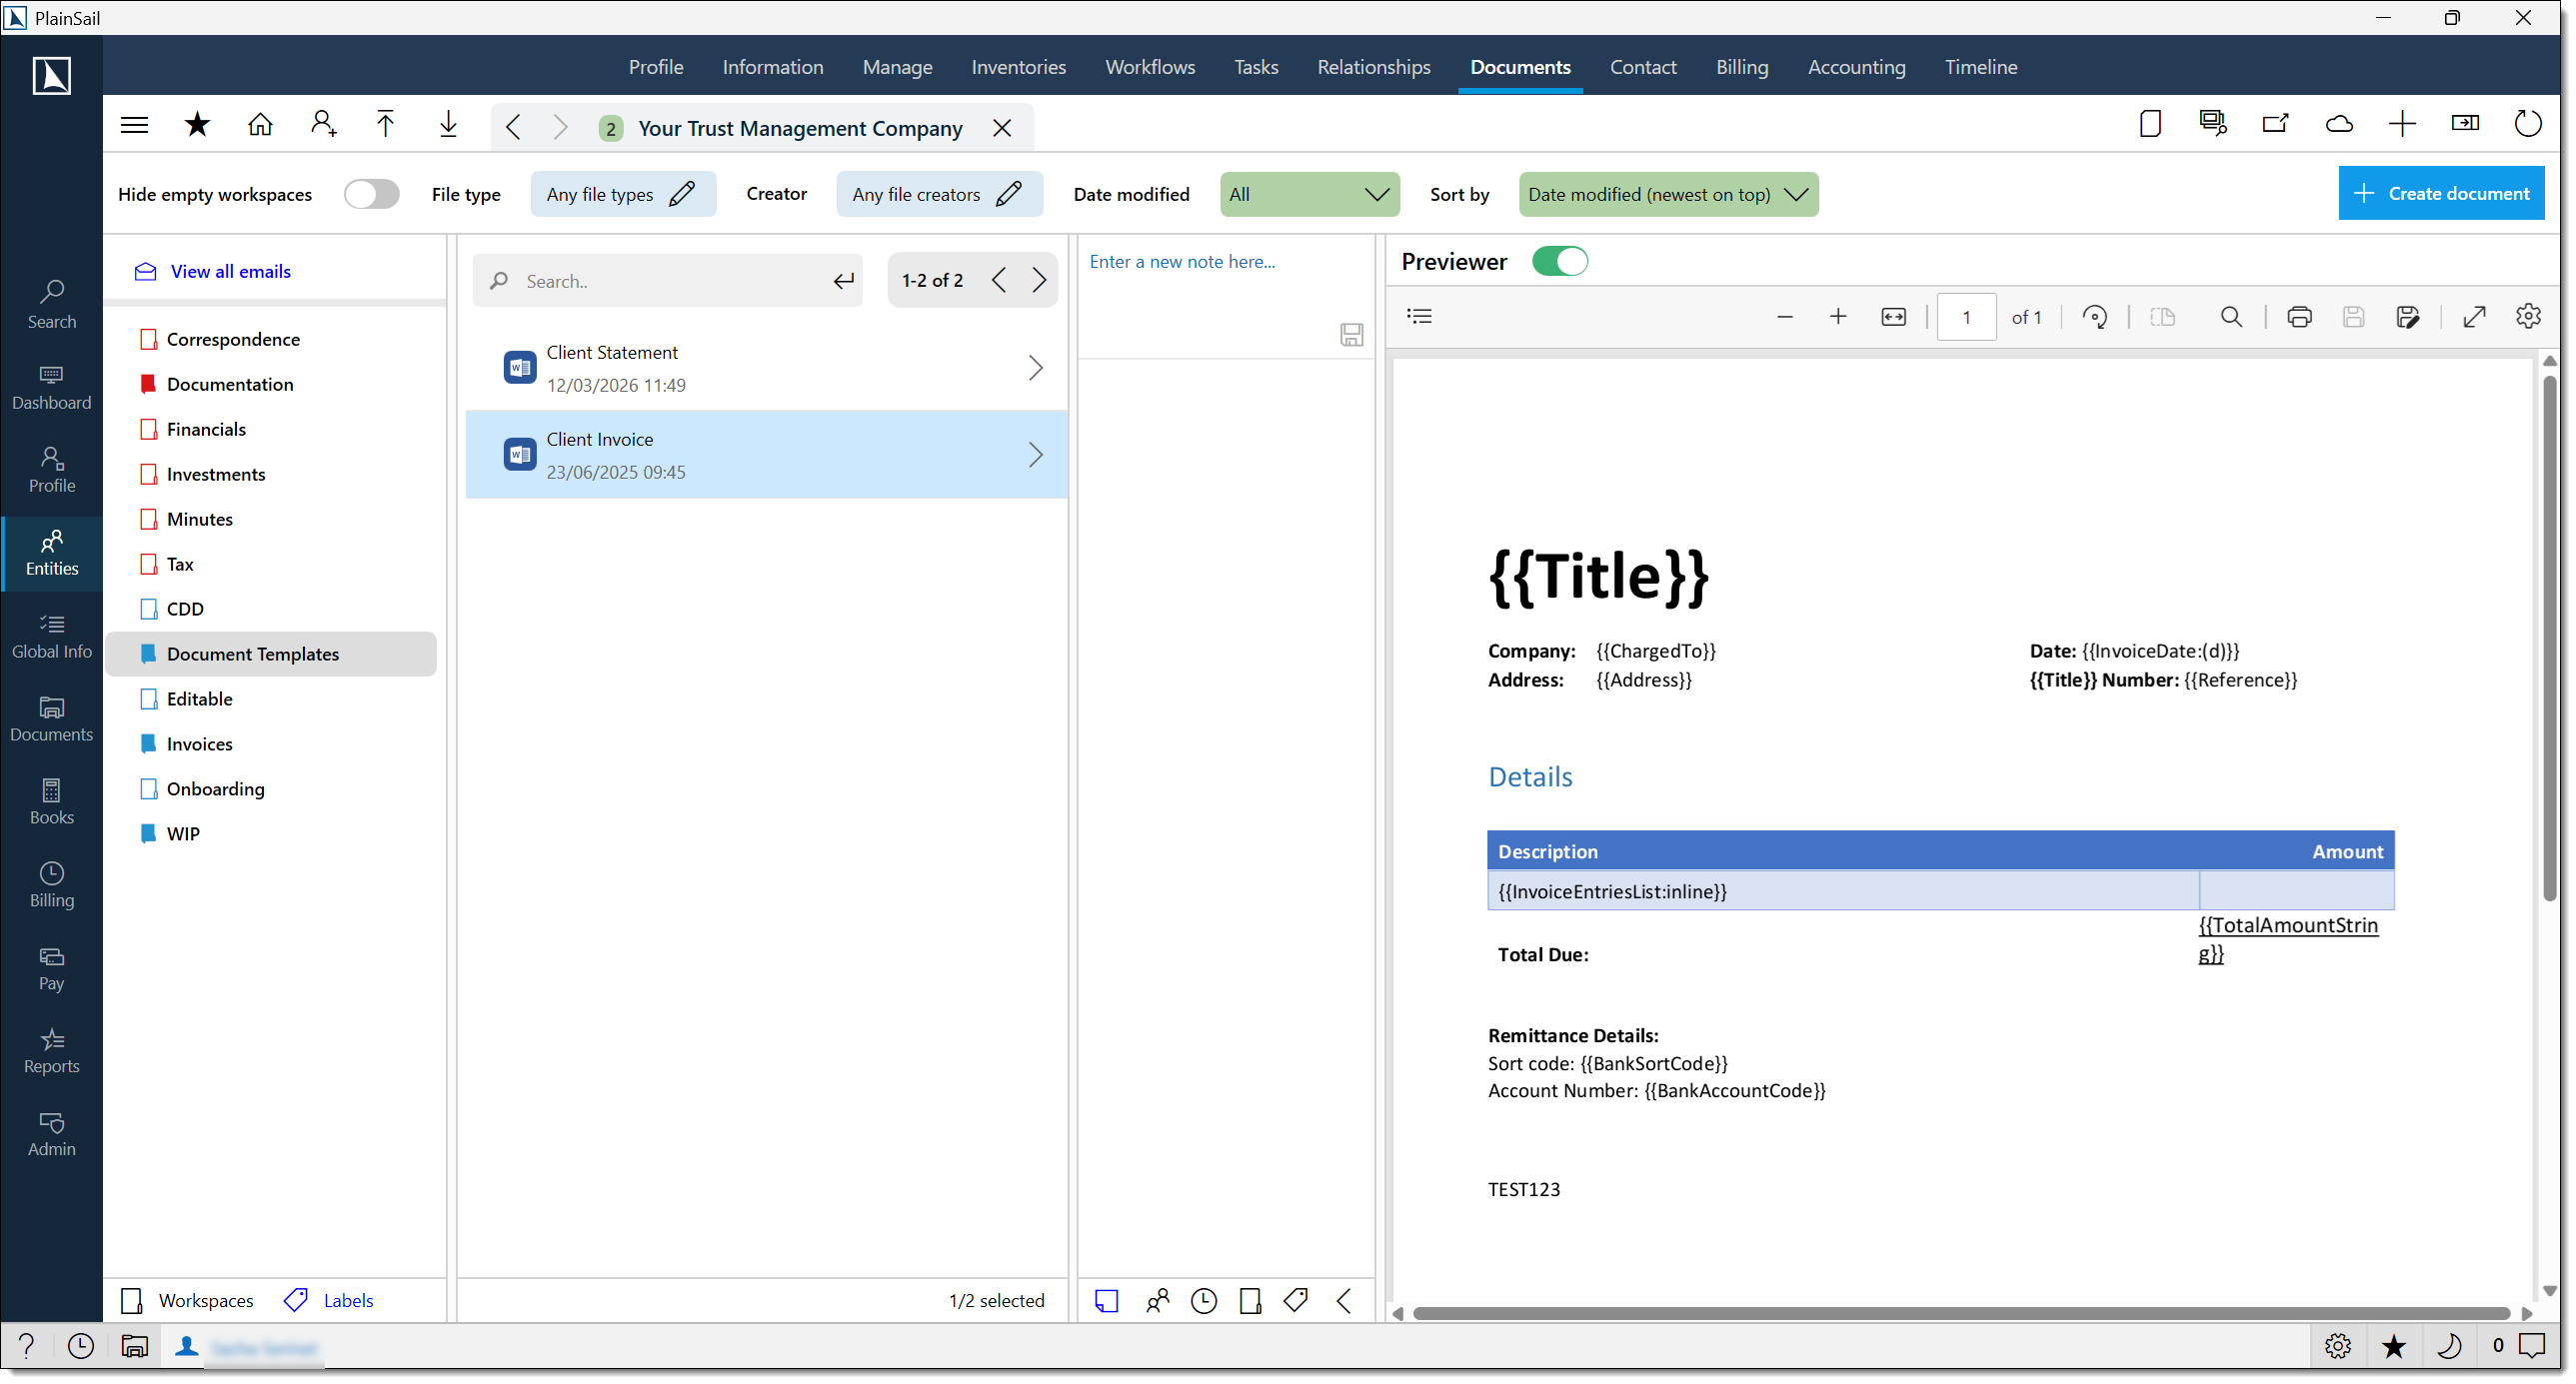
To modify a template:
- Navigate to the charging entity → Documents → Document Templates.
- Open the Client Invoice template for editing.
- Adjust the layout in Microsoft Word – take care not to remove any
{{ marker }}fields. - Save, close, and check the document back into PlainSail via the bottom bar.
Common template markers
Invoice templates use the same {{MarkerName}} syntax as document templates, plus billing-specific markers:
| Marker | Description |
|---|---|
{{InvoiceNumber}} |
The invoice reference number. |
{{InvoiceDate}} |
The date the invoice was raised. |
{{InvoiceTotal}} |
The total amount including tax. |
{{InvoiceSubTotal}} |
The amount before tax. |
{{InvoiceTax}} |
The tax amount. |
{{EntityName}} |
The client entity name. |
{{ChargingEntityName}} |
The name of the charging entity (your company or department). |
{{Address}} |
The client’s billing address. |
{{forperiodended}} |
The billing period end date (from fee narrative markers). |
{{wipperiodended}} |
The WIP period end date. |
_ClientInvoice.docx and _ClientInvoiceEmail.txt are stored in the Organisation Record’s Document Templates workspace.
Deferred Income
PlainSail supports deferred income recognition for fees billed in advance of the service period. To use this feature:
- The fee type must have a Deferred Income G/L account configured.
- The flat fee must have a future fee period specified.
- PlainSail calculates the deferral using exact month fractions – if the start date is the 1st and the end date is the last day of the month, whole months are used.
How deferred income works
- An invoice is raised for a future period (e.g. annual administration fee invoiced at the start of the year).
- The invoice amount is posted to a deferred income liability account in the entity’s accounting ledger.
- As each month or period passes, a journal entry releases a portion of the deferred income to the revenue account.
- The release schedule is configured via the fee type’s billing frequency and the entity’s billing preferences.
Viewing deferred income
- Navigate to the entity’s Accounting tab > Trial Balance.
- Look for the deferred income liability account.
- The balance represents income that has been invoiced but not yet earned.
Configuration
Deferred income behaviour is controlled by:
- The fee type configuration (whether the fee is treated as deferred).
- The recurring fee schedule (monthly, quarterly, annually).
- The ledger mapping for the fee type (which revenue and liability accounts are used).
WIP Approval Lifecycle
This section walks through the full journey of work-in-progress from the moment finance sends it for approval to the point an invoice is raised or the WIP is marked complete. It covers the two screens involved – WIP (used by finance) and WIP Approvals (used by reviewers) – the shared View WIP detail screen, the two approver roles, and the status each item moves through.
1. Finance sends WIP for approval
Finance starts the process from Billing → WIP by sending selected client and charging-entity combinations for approval. This creates (or refreshes) an approval record for each one.
Open Billing → WIP and set the WIP date as at – the cut-off date for the billing period. Changing this date re-loads the WIP figures.
Click Send for approval to open the send dialog. (This button is only visible to users who can finalise WIP.)
Choose the rows to include, set the two approver roles and the dates, then click Send. A confirmation prompt summarises the number of items selected, the WIP date, and how the invoice date will be applied.
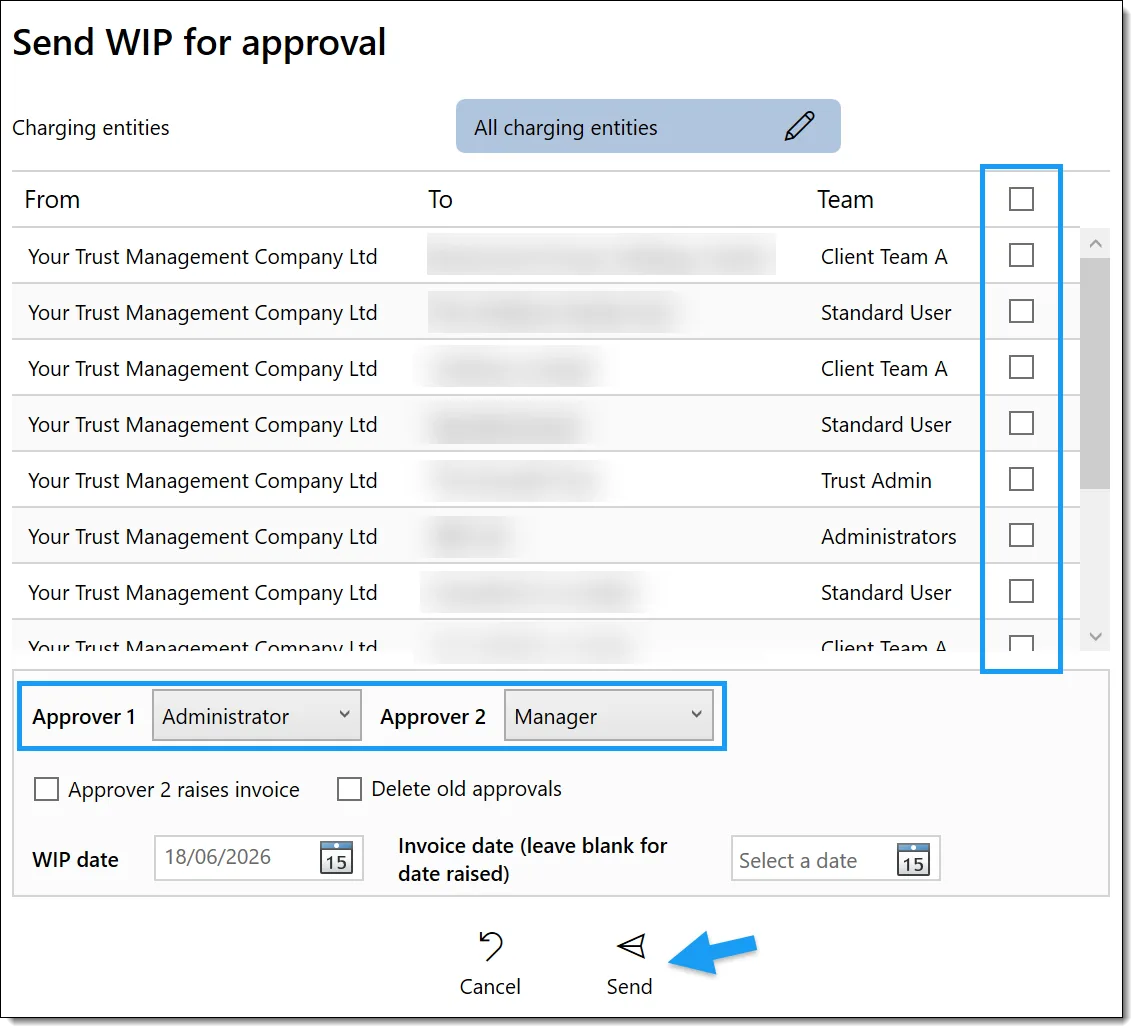
The send-for-approval dialog contains the following fields:
| Field | Purpose |
|---|---|
| Charging entities | Defaults to all charging entities. Use Choose charging entities to narrow the list. |
| From / To / Team grid | Lists each client and charging-entity pair available to send, with a select checkbox per row. A Select all toggle selects or clears every row at once. |
| Approver 1 / Approver 2 | Each is chosen from a fixed set of roles: Administrator, Manager, or Client Director. Defaults are Administrator for Approver 1 and Manager for Approver 2. Your previous selections are remembered between sessions. |
| Approver 2 raises invoice | When ticked, the second approver raises the invoice directly instead of simply confirming. |
| Delete old approvals | When ticked, existing approval records are removed before the new ones are created. |
| WIP date | Optional. The cut-off date the approval is based on. |
| Invoice date (leave blank for date raised) | Optional. If left blank, the invoice takes the date it is actually raised. |
| Send / Cancel | Send creates the approvals and notifies the first approver; Cancel closes the dialog without sending. |
When you click Send, PlainSail works out who each approver is and prepares the approval records:
- Each approver role is resolved to a real person from the client’s appointments – Administrator, Manager, or Client Director – rather than by picking a named user in the dialog.
- Approver One is taken from the first role that resolves to someone. If no approver can be found, the person sending the WIP becomes Approver One and a warning is recorded against that item.
- Approver Two is only set when it resolves to a different person from Approver One.
- If a matching approval already exists, it is reset – previous completion dates, comments, and any invoice-line overrides are cleared.
- Only Approver One is notified at this stage, with the message “You have new WIP to approve”. Any warnings are shown back to finance.
- Delete old approvals removes every existing approval record – not just the rows you selected.
- Approvers come from the client’s appointment roles, so make sure the Administrator, Manager, and Director are set correctly on the client first.
- Only Approver One receives the initial notification; Approver Two is notified once Approver One has confirmed.
Billing_WIP_View– access Billing → WIP.Billing_WIP_Finalise– see Send for approval, Finalise multiple, and Finalise selected.Billing_WIP_Create– create standard fees and disbursements.
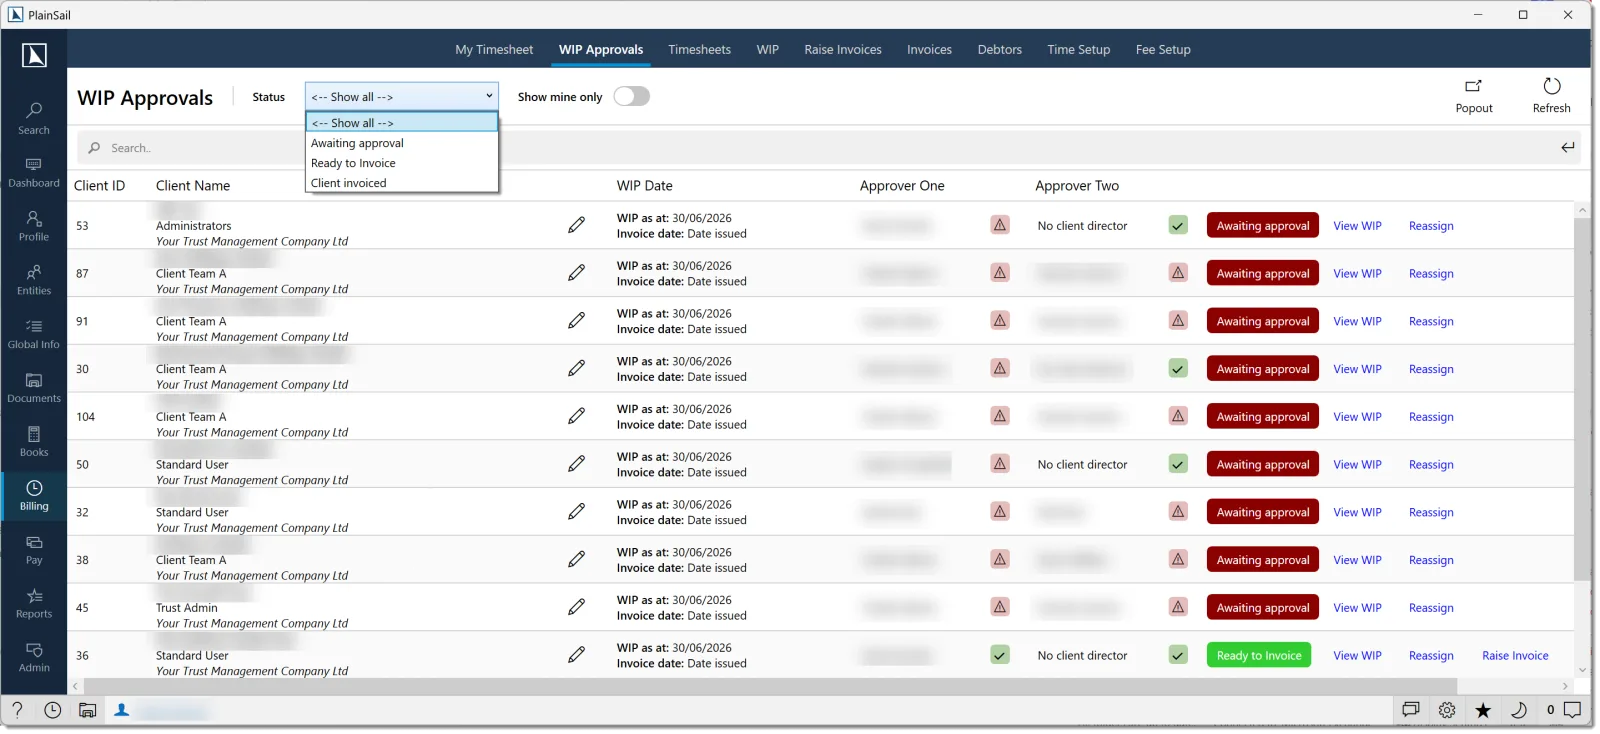
2. Reviewing WIP in WIP Approvals
Reviewers work from Billing → WIP Approvals. From here they can review what finance has sent, approve it, change the second approver, send it back, raise the invoice, or mark it complete.
The approvals list
The list gives you a filterable overview of every approval you can see:
- Status filter: Show all, Awaiting approval, Ready to Invoice, or Client invoiced.
- Show mine only – on by default, so you start with just your own items. Turn it off (if permitted) to see all approvals.
- Popout, Refresh, and a search bar.
Each row shows the Client ID and Client Name (with team and charging entity), an editable Comment, the WIP date and invoice date, both approvers with a status icon each, and a status badge of Awaiting approval, Ready to Invoice, or Client invoiced. The available row actions are:
- View WIP – open the detailed review screen (see below).
- Reassign – change the approvers (finance / finalise users only).
- Raise Invoice – generate the invoice once the item is ready.
- Mark as Complete – close the approval without raising an invoice.
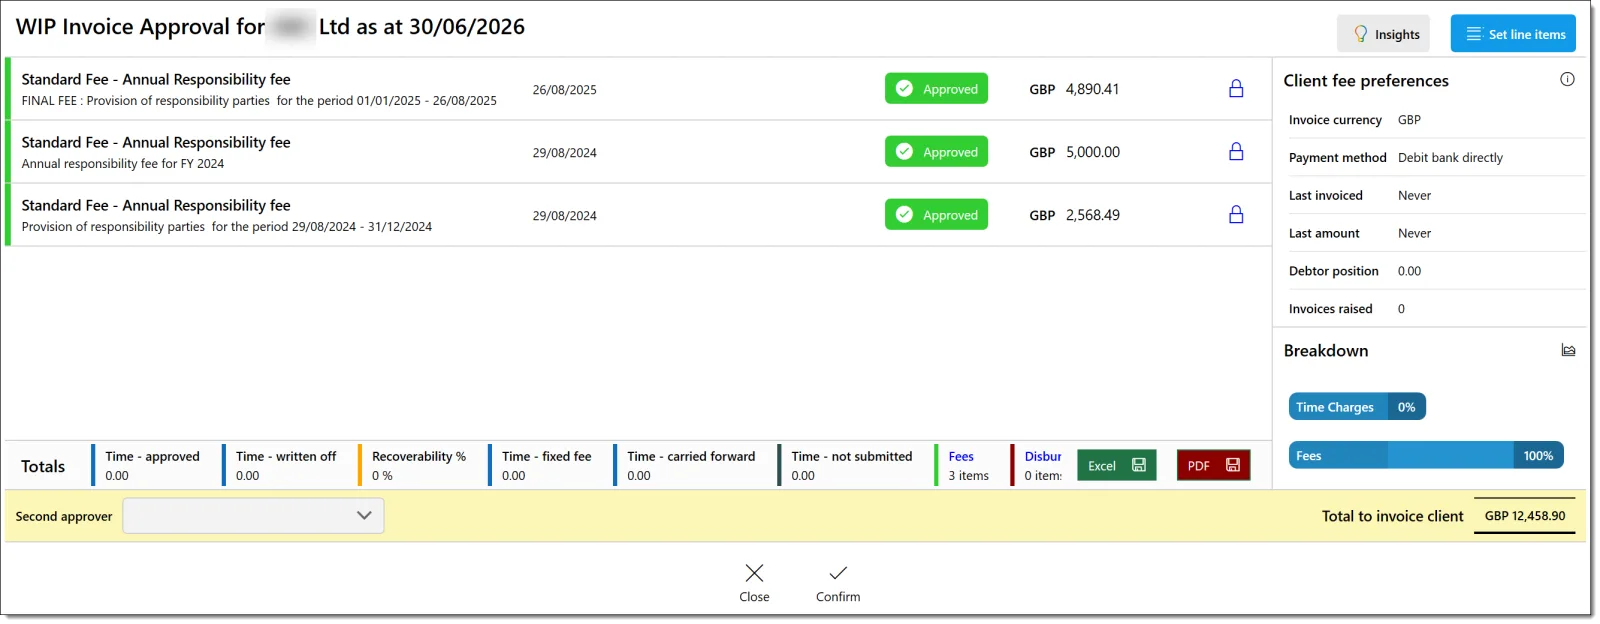
The detail review screen
Clicking View WIP opens the review screen, which embeds the full View WIP detail (covered in the next section) plus the following:
- Insights – opens the Billing Insights report for the client.
- Set line items – edit how the invoice lines will be displayed.
- Second approver – shown only when a second approver is required, letting Approver One choose or change who that is.
- Send back to approver one – shown only to the second approver.
- Total to invoice client – the running total of approved WIP.
- Close, plus either Confirm or Raise invoice depending on the stage and configuration.
How the two approver roles differ
Approver One sees an item as soon as finance sends it. When Approver One opens it:
- The Second approver selector is shown, so they can confirm or change who reviews it next.
- Clicking Confirm prompts “Are you sure you wish to confirm this WIP?”. If the second approver was changed, the reassignment is applied first, then the item records Approver One’s completion.
Approver Two only sees an item after Approver One has confirmed it. When Approver Two opens it:
- Send back to approver one is available.
- If Approver 2 raises invoice was set, Approver Two sees Raise invoice rather than Confirm; otherwise they simply Confirm to record their completion.
Finance users with finalise permission can additionally turn off Show mine only to load every approval, reassign approvers, raise invoices, and mark items complete without an invoice.
The status badges mean:
- Awaiting approval – at least one approver still needs to confirm.
- Ready to Invoice – both approvers have confirmed and the item is not yet completed.
- Client invoiced – the approval has been completed (invoiced or marked complete).
Sending WIP back to Approver One
As the second approver, click Send back to approver one.
Enter a reason – this is required and is saved as the approval’s comment.
The item returns to Approver One. Both approvers’ completion dates are cleared, so the review starts again.
Marking complete without invoicing
Finance can close an approval without raising an invoice using Mark as Complete. You’ll be asked to confirm: “Are you sure you wish to mark this as completed and NOT raise an invoice?”. The item is then recorded as completed.
- Sending back to Approver One clears both approvers’ confirmations.
- Finance / finalise actions require
Billing_WIP_Finalise; full visibility of all clients’ approvals additionally depends onEntities_Accounting_ViewPracticeManagementAccounts(without it, finance sees only entities in their own teams). - Confirming has no effect if you are neither the pending first nor the pending second approver.
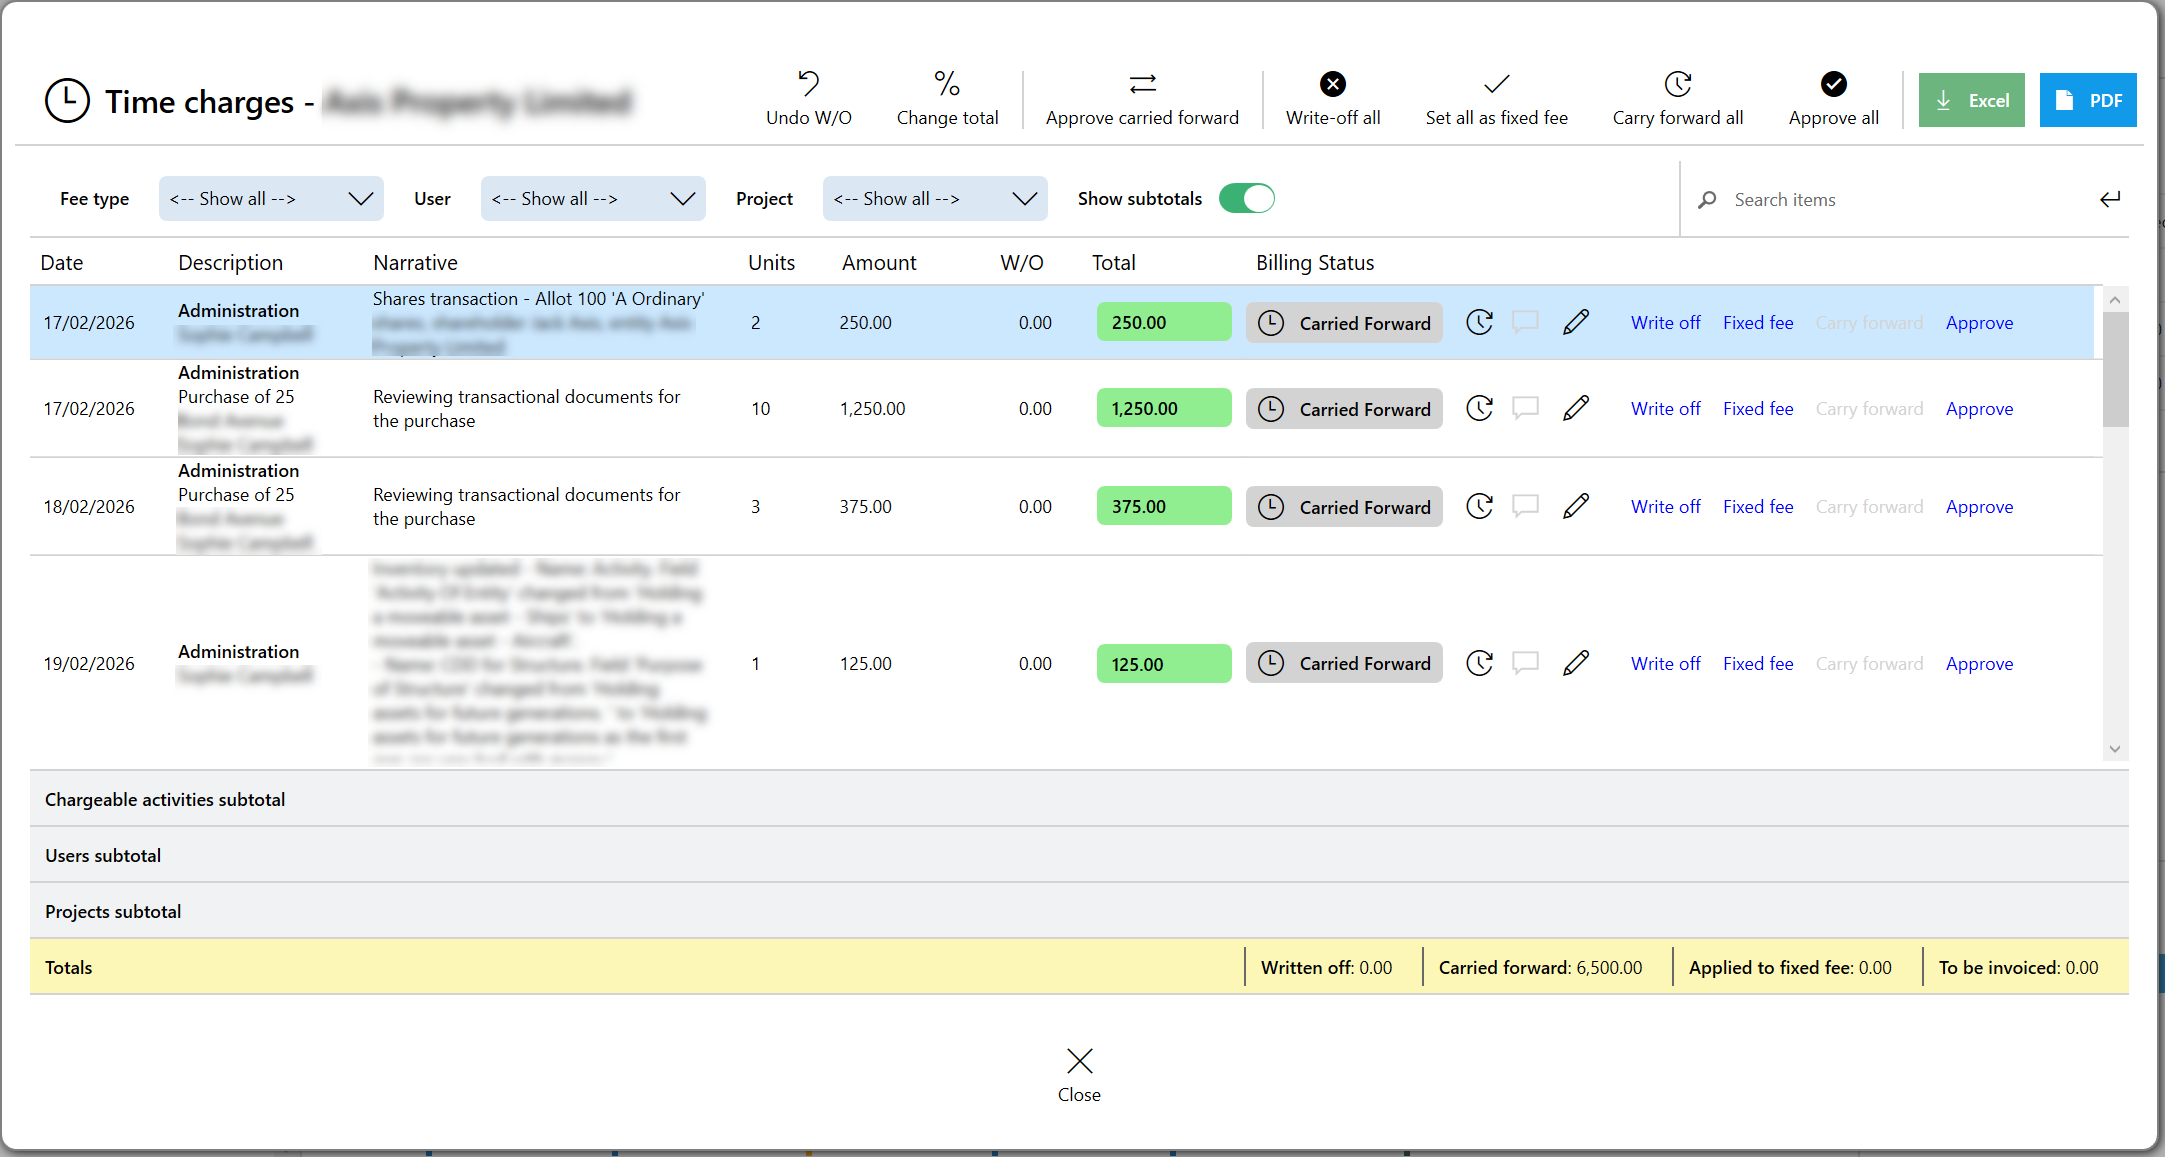
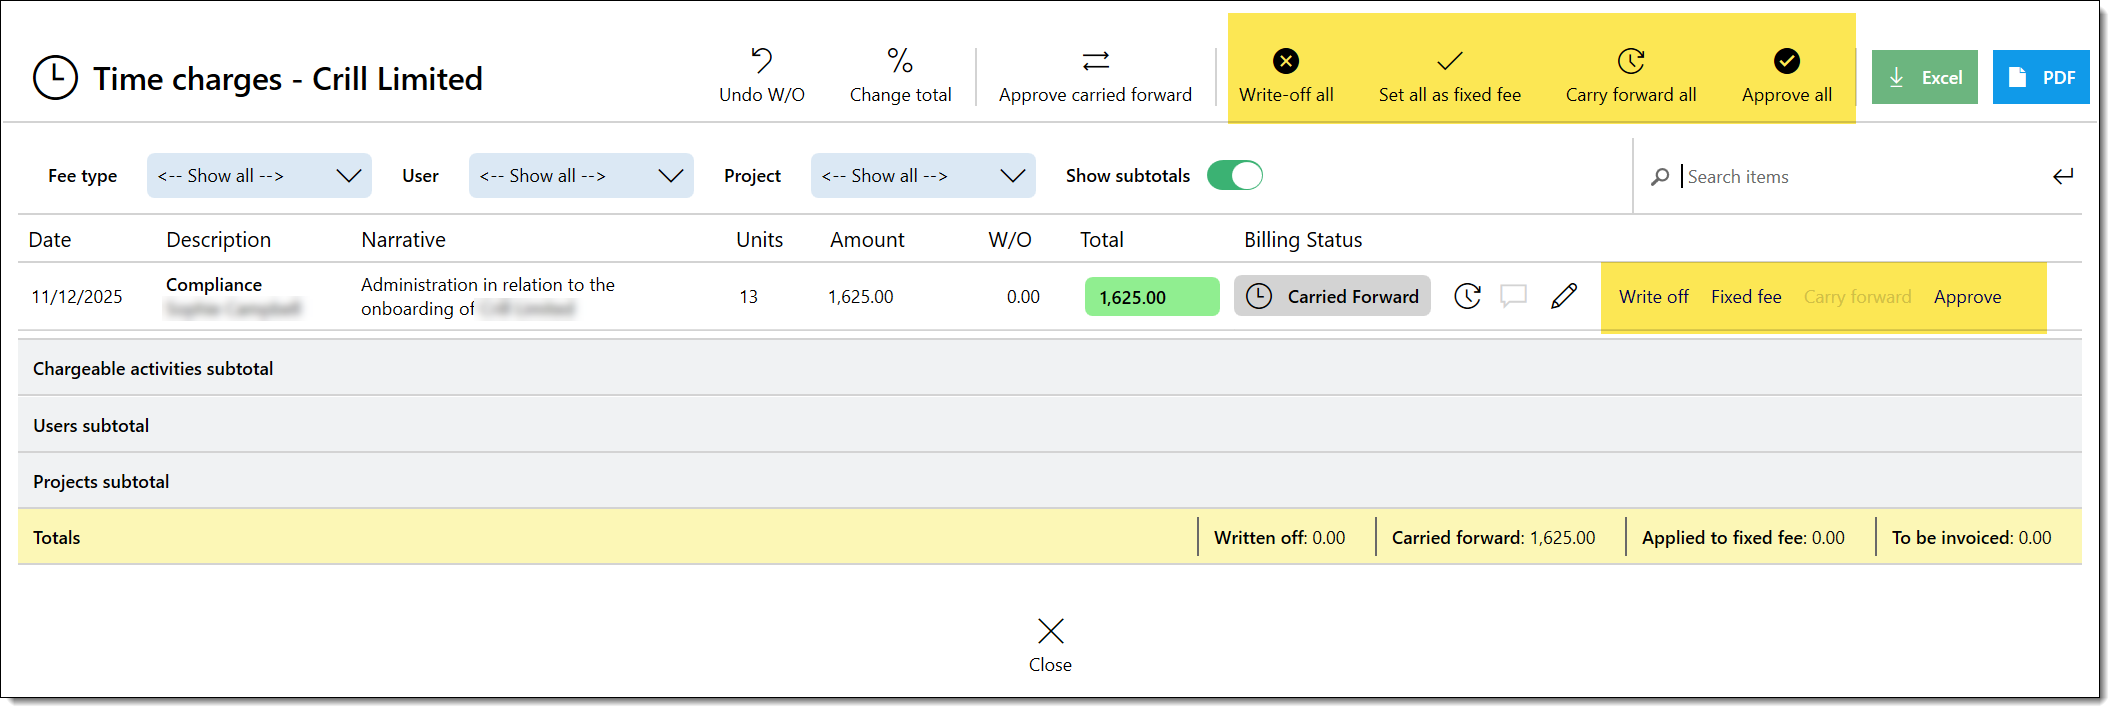
3. The View WIP detail screen
The View WIP detail screen is shared by finance (from the WIP screen) and reviewers (from WIP Approvals). It lets you inspect WIP lines, change billing statuses, drill into time charges, write off or carry forward time, edit fee and disbursement items, and override invoice-line narratives.
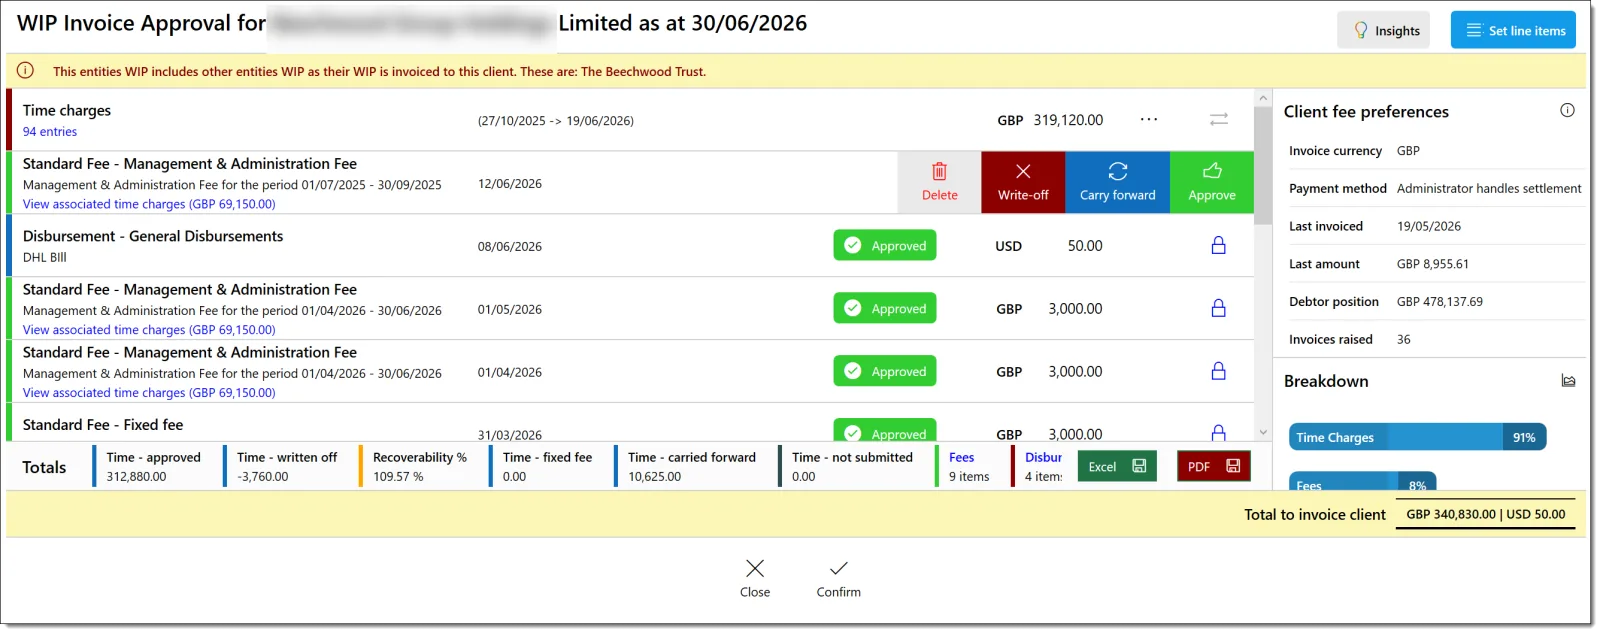
Each WIP row shows a type colour indicator, a select control, the title and narrative with a drill-down link, the date range, a status badge for fee and disbursement rows, the currency and amount, and a set of actions – Delete, Write-off, Carry forward, Approve, view time charges, edit, change status, or a padlock for finalised items.
The footer totals summarise time approved, time written off, recoverability percentage, fixed-fee time, carried-forward time, unsubmitted time, fees, disbursements, and the selected total, with export buttons. A right-hand panel shows the client’s fee preferences (invoice currency, payment method, last invoiced amount and date, debtor position, invoices raised), billing notes, and breakdown buttons.
Only HR-approved time appears in the normal chargeable time group. Unauthorised time, HR-approved time, and finalised time are grouped separately, alongside fees and disbursements.
Carry forward
Carrying an item forward defers it to a later period – in the UI this status is shown as Carried Forward.
- For fee and disbursement rows, Carry forward changes the row’s status and saves it.
- For time entries, Carry forward all asks for confirmation and moves all displayed time records forward; an individual Carry forward moves a single entry.
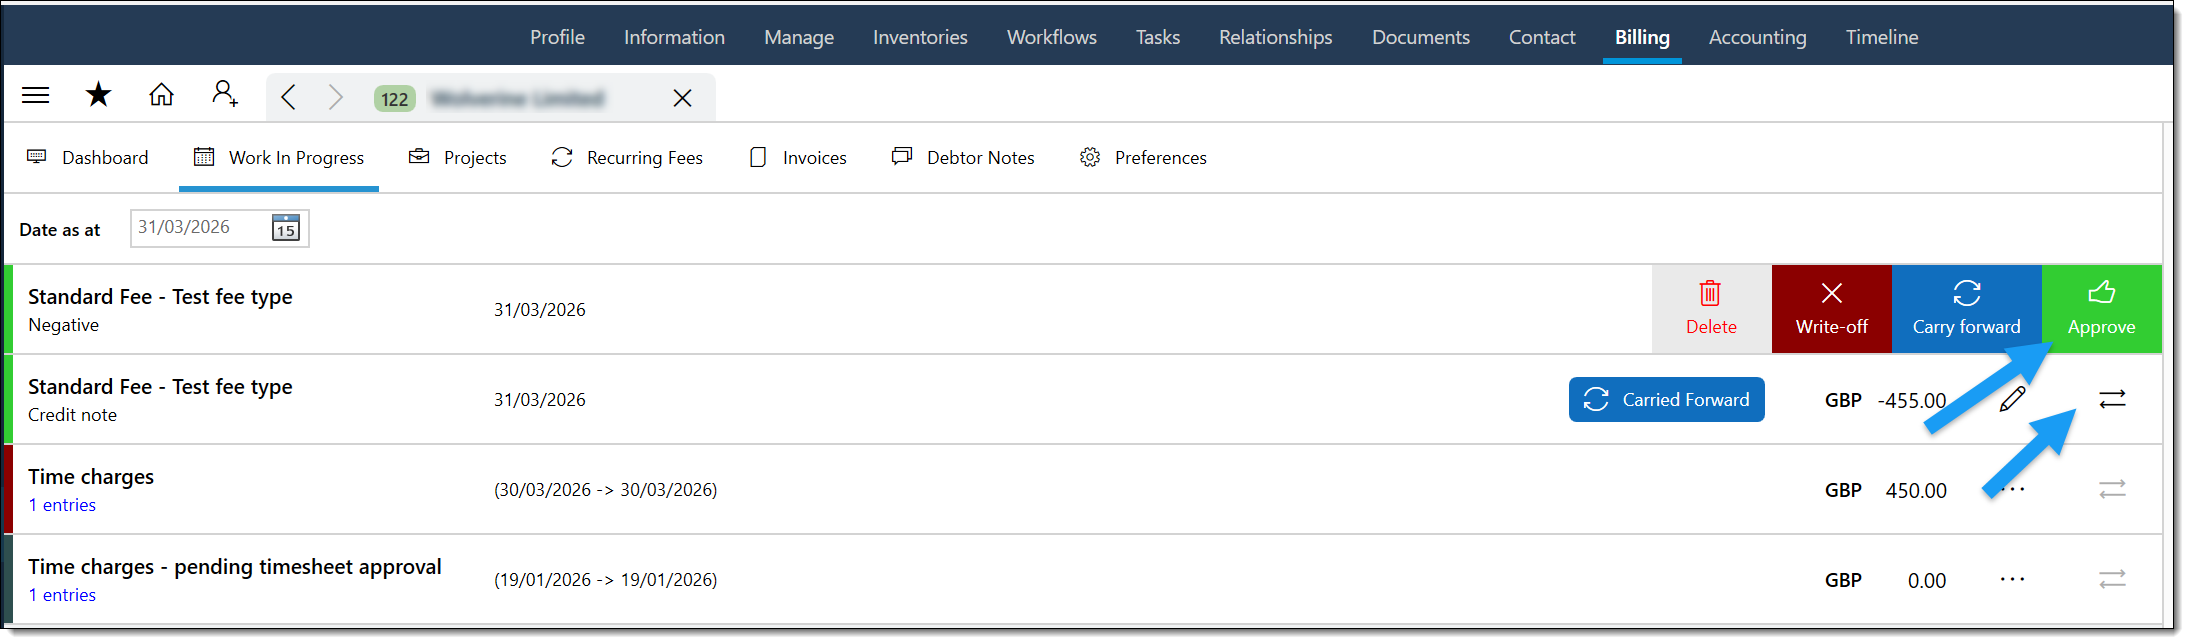
Write off
- For fee and disbursement rows, Write-off sets the row to written off and records an audit note. Finalised fee transactions cannot have their status changed.
- For time entries, Write off all confirms and applies only to HR-approved records. An individual Write off sets the entry to written off; a written-off (or fixed-fee) entry has nothing left to charge.
Change total (proportionate write-off)
Change total, on the time drill-down screen, lets you reduce an approved total to a new figure. The difference is written off proportionately across the underlying approved entries:
Only approved time records are considered, grouped by fee type.
Each item is first reset to its pre-write-off value, then the required reduction is spread proportionally across the records.
Any rounding remainder is placed on the largest item, and the new total is checked against the figure you requested before the changes are saved.
Invoice line-item override
Invoice line-item overrides change how invoice lines are displayed; they do not change the underlying WIP values. Open Set line items on the review screen to:
- Edit a line’s narrative and amount, add lines, add the remainder, or delete lines.
- Save – which validates that the line total equals the required total and that every line has a narrative – or cancel.
Saved overrides are stored against the approval and re-validated against the generated invoice totals before the invoice is accepted or raised.
Individual time-entry actions
In the time drill-down, each row offers history, add note, edit, Write off, Fixed fee, Carry forward, and Approve. Each action sets the entry’s billing status accordingly and saves it.
- Editing WIP items requires
Billing_WIP_Edit; finalising or deleting requiresBilling_WIP_Finalise. - Fee and disbursement status changes are blocked once the transaction is finalised.
- Time-entry status can only be changed when the record is HR approved and not finalised.
- Change total and Write off all apply only to approved / HR-approved time, but Carry forward all updates every displayed record.
- Finalised entries show a padlock and cannot be edited or status-changed through the normal screens.
4. End-to-end lifecycle
Putting it all together, a single piece of work travels through these stages:
Time recorded – the submitter records time, which starts as a draft.
Time submitted – the submitter submits month-end (or a full week). The timesheet is locked up to the submitted date.
Timesheet approved – either automatically (if the user’s auto-approval option is on) or by an HR approver. The time becomes HR approved and eligible for billing.
Finance sends WIP for approval – from Billing → WIP → Send for approval. An approval record is created (or reset) and Approver One is notified.
Approver One reviews – opens View WIP and confirms, recording their completion.
Approver Two reviews (if required) – confirms, or raises the invoice if configured to do so.
Invoice raised or marked complete – the approval is closed, either by raising the invoice or marking it complete without one.
5. Status flow at a glance
The same journey, shown as the status each item moves through. The first three stages cover the timesheet; the rest cover the WIP approval itself.
Keyboard Shortcuts
- Ctrl+N – New time entry
- Ctrl+C / Ctrl+V – Copy / paste time entry (via right-click context menu on the calendar)
- Ctrl+B – Toggle the sidebar panel
- Ctrl+Left / Ctrl+Right – Navigate to the previous / next week
- Ctrl++ – Add a new time entry
- F5 – Refresh current view
- Delete – Delete selected time entry (also available via right-click context menu)
Permissions Reference
The following permissions control access to billing and timekeeping features. Permissions are assigned via Admin > Roles & Permissions.
| Permission | Description |
|---|---|
Billing_EnterTime |
Enter time on your weekly timesheet. |
Billing_HR_ViewTimeSheets |
View all timesheets (management / HR view). |
Billing_HR_ApproveTimeSheets |
Approve submitted timesheets. |
Billing_HR_EditTimesheets |
Edit submitted timesheets. |
Timesheets_ViewAllUsersTimesheets |
View timesheets for all users (not just direct reports). |
Timesheets_ApproveOvertime |
Approve overtime claims. |
Billing_WIP_View |
View work-in-progress. |
Billing_WIP_Create |
Create WIP entries manually. |
Billing_WIP_Edit |
Edit WIP entries. |
Billing_WIP_Finalise |
Finalise WIP for invoicing. |
Billing_RaiseInvoices |
Generate and raise invoices. |
Billing_ViewRaisedInvoices |
View raised invoices. |
Billing_ViewDebtors |
View aged debtors reports. |
Billing_TimeSetup |
Configure activity rates, rate bands, and working hours. |
Billing_FeeSetup |
Configure fee types, recurring fees, and charging entities. |
Billing_ProjectSetup |
Configure billing projects. |
Entities_Billing_View |
Access the entity-level Billing tab. |
Entities_Billing_EditPreferences |
Edit entity billing preferences. |
FAQ
How do I restart the approval route for a single entity?
Navigate to Billing → WIP → Send for Approval, select only the entity in question, ensure Delete Old Approvals is not ticked, and click Send.
A client's WIP shows a padlock icon – how do I unlock it?
The padlock indicates WIP has been moved to the invoicing stage. Navigate to Billing → Raise Invoice and click Move Back to WIP against the relevant entity.
Can I write off WIP without raising an invoice?
WIP write-offs must go through the invoice process with the status set to Write Off. This produces a nil-value invoice for audit purposes.
What happens if I need to add a disbursement supplement (e.g. 3%)?
During invoice generation, additional fixed-fee charges can be added on the summary screen before final approval. Enter the supplementary amount as a separate line.
How is multi-currency WIP handled?
If the entity's invoice currency differs from the WIP currency, PlainSail converts the amounts at the exchange rate in effect at the time of invoicing.
How do I handle partial payments?
Post a receipt for the amount received. The remaining balance stays on the debtors report. Post additional receipts as further payments are received.
How do I correct a posted timesheet entry?
If the timesheet has been submitted, it must be rejected by the approver or edited by a manager with the Billing_HR_EditTimesheets role. You cannot edit submitted entries yourself.
How do I write off old WIP?
Set the WIP items’ status to Write Off and raise an invoice in the normal way. The system produces a nil-value invoice, clearing the WIP and providing a full audit trail. See WIP write-off procedure for details.
How do I configure auto-emailing of invoices?
Ensure SMTP is configured in the system Configuration screen. The invoice email template (_ClientInvoiceEmail.txt) must exist in the Organisation Record’s Document Templates workspace. Contact your administrator for setup.
How do I run the aged debtors report?
Navigate to Billing > Debtors or click the “Debtors” tile on the Dashboard Billing widget. You need the Billing_ViewDebtors permission.
- Entities & Client View – entity-level billing tabs and client records
- Accounting – ledger postings, journal entries, and financial reporting
- Document Management – invoice templates and document generation
Test Yourself
How well do you know the billing lifecycle? These 10 questions focus on the everyday tasks that keep invoicing running smoothly.